When you desire to play Apple Music on devices not supported by Apple Music, or are considering moving Apple Music downloads to other devices for preservation because of running out of storage, you probably have a demand to put Apple Music to USB drives for more convenient accessing. Unfortunately, Apple’s FairPlay DRM prevents you from doing this.
In fact, transferring Apple Music to USB is not a difficult task if you find the right tool to decrypt Apple Music DRM. In this blog, we have tested and brought the best solution to help download and put Apple Music to USB stick without hassle. Now, grasp the way and see how it works.
Download Apple Music to MP3 Before Adding to USB
As we all know, Apple has restricted access to Apple Music unless you become a registered member with a premium subscription. In addition, even for premium subscribers, the Apple Music download function will limit the usage of all music downloads – you can only access and play them within Apple Music apps. Worse yet, when your Apple Music subscription expires, all of them will be removed unless you keep renewing it, let alone moving them to save on USB or other devices without Apple Music apps installed.
All these restrictions are exciting because of Apple’s FairPlay DRM encryption. If you desire to put Apple Music to USB, you will need to remove DRM first. For this purpose, MuConvert Apple Music Converter is the exact software we’d like to recommend. It empowers powerful functions to decrypt Apple’s FairPlay DRM encryption, then helps you to convert Apple Music to MP3 and other mainstream formats for keeping offline with original quality. It will maintain lossless Apple Music effects to output all downloads, with full ID3 info preserved for easier music management offline.
The software also delivers ultra-fast downloading speed with multiple hardware acceleration technologies applied, which can perform 20X faster to batch download Apple Music albums simultaneously. Once you get all DRM-free Apple Music songs saved on desktops, you can insert your USB stick into the computers and then directly move Apple Music to USB stick right away. Then, you are available to play Apple Music songs everywhere whenever you need.
- Integration with Apple Music web player to process music download without iTunes/Apple Music app installed.
- The most mainstream formats such as MP3, M4A, WAV, and FLAC are available to save downloaded Apple Music tracks.
- Best at 20X faster speed to batch download multiple Apple Music songs simultaneously to save time.
- Customized parameter settings to help personalize your music streaming experience based on your own needs.
- Well-preserve all ID3 info with the downloaded tracks to make sure offline music ordering is simple.
MuConvert Apple Music Converter is considered to be the best Apple Music downloader, offering an intuitive interface and easy-to-grasp operations to let you download and save Apple Music to USB without hassle. Now, grasp the brief guide and see how it works:
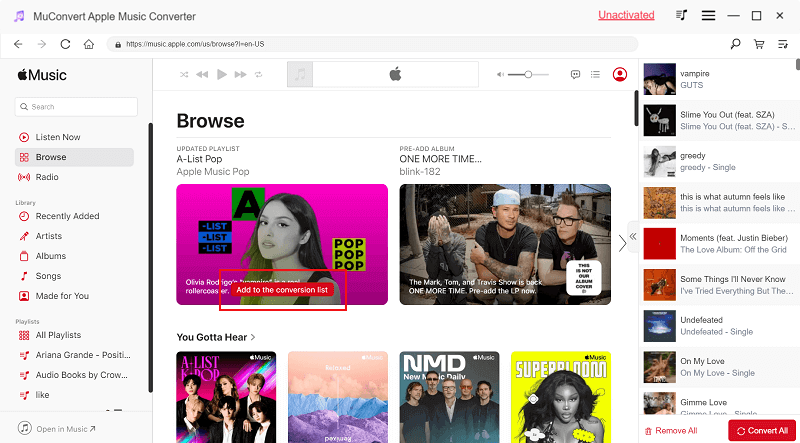
STEP 1. Once complete the software installation, launch MuConvert Apple Music Converter and hit “Open the Apple web player” on the welcome page to access the built-in web player for logging in.

STEP 2. Once log in, you can search for any Apple Music album or track to add to the converting list on the right side. You are also able to click the “Add to the converting list” icon equipped for every song and album. The songs will then be imported into the converting queue.
STEP 3. Now in the converting window, you can adjust output parameters such as the format, sample rate, and bitrate to download Apple Music songs as you desire. MP3 is the most widely-supported format and is recommended to select if you later need to move Apple Music to USB.
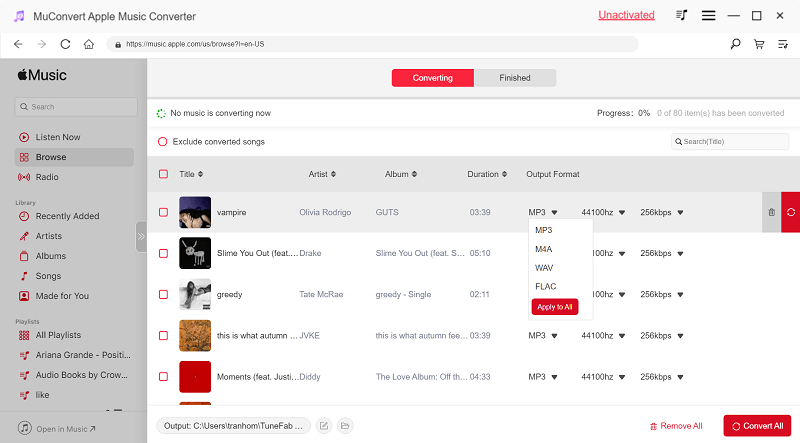
STEP 4. Finally, simply tap on the “Convert All” icon, and then MuConvert Apple Music Converter will remove DRM and convert Apple Music to MP3 for you right away! Once complete, you can access the downloads and get ready to move Apple Music to USB.

How to Transfer Music from Apple Music to USB
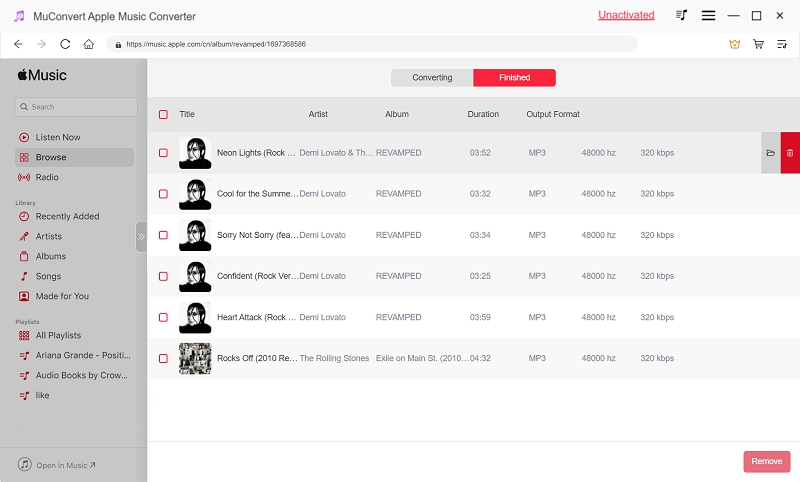
Once the music download is completed in MuConvert Apple Music Converter, you can access them under the “Finished” module by hitting the “View Output File” button.
Then, continue on the next steps to transfer Apple Music to USB flash drive right away. Both tutorials for Windows and Mac are provided, just follow the one based on the device systems you are using:
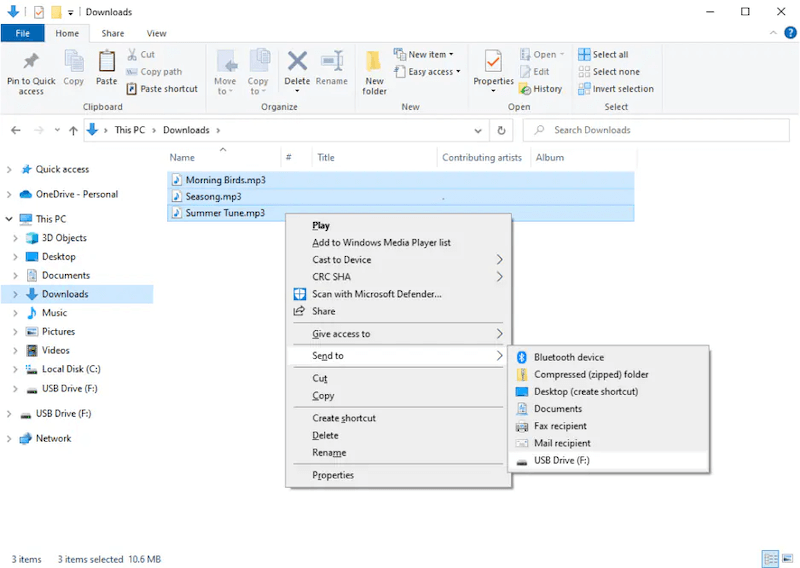
Move Apple Music on USB – Windows
STEP 1. Directly insert your USB hard drive into the USB port on your computer.
STEP 2. Open “File Explorer” and double-click on the USB drive folder once the computer has detected it.
STEP 3. Now, directly drag the downloaded Apple Music songs from MuConvert’s local folder and drop them into your USB flash drive folder, or highlight the music files and select sending to it to complete the music transfer.
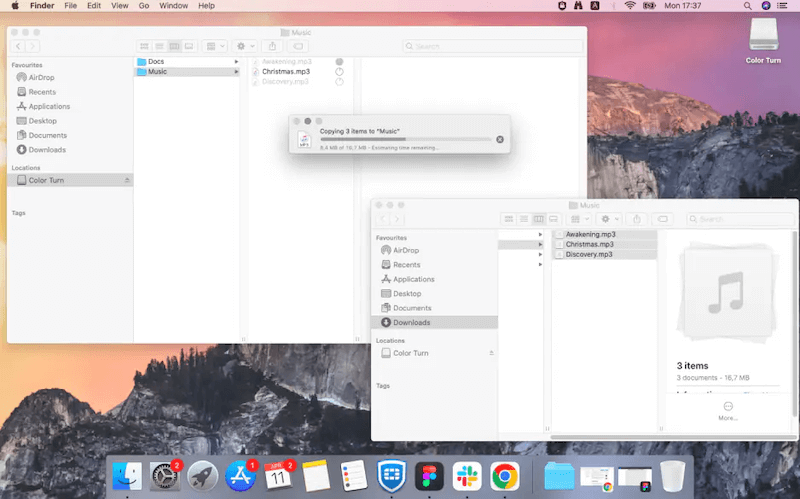
Put Apple Music on USB Stick – Mac
STEP 1. Use an external hard drive to connect and insert the USB flash drive to your Mac first.
STEP 2. Once your Mac detects the stick, you can open the Finder window and switch to the USB drive from the left navigation bar.
STEP 3. Now, you can also open the output folder which saves the downloaded Apple Music tracks, then drag them to the USB drive folder to save them right away.
How to Transfer Purchased Apple Music to Flash Drive
Before subscribing to Apple’s streaming music service, many users probably used iTunes to purchase singles to enjoy. These purchased iTunes songs are protection-free, and can directly be downloaded and exported as MP3 files to put onto a USB stick.
However, as Mac is no longer equipped with iTunes, you can’t purchase or download singles like used to do on Windows computers. Hence, to download purchased iTunes music, you need to log in to the same Apple Music Music app on Mac, and then use MuConvert Apple Music Converter to download them instead.
Now, if you own purchased Apple Music singles from the iTunes Store, grasp the following steps to see how to transfer music from iTunes to flash drive with ease on Windows:
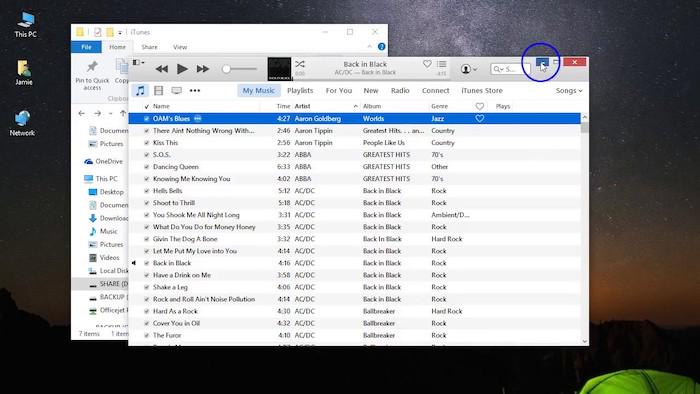
STEP 1. Launch iTunes and log into your account to access your purchased iTunes songs in the library.
STEP 2. Then plug the USB stick or flash drive into the computer and open it.
STEP 3. Simply drag those you need to move to the USB/flash drive folder, and they can be transferred successfully.
However, if the music transfer from iTunes to USB fails, you can try converting them to local MP3 files first, then put them onto the USB stick or the flash drive
FAQs About Saving Apple Music to USB
Also grasp these FAQs if you still have any confusion transferring Apple Music to USB.
Q. Why Can’t I Export Music from iTunes to USB?
A: There can be multiple reasons stopping you from exporting music from iTunes to USB, including:
- iTunes songs are encrypted by DRM, which prevents them from being transferred outside iTunes;
- The music formats are not supported by your USB stick or flash drive;
- Your USB or the music files are damaged;
- The file sizes exceed the maximum storage space of the USB stick, so the transfer fails;
- File transfer is limited because of improper iTunes settings.
Once you locate the reasons preventing you from exporting music from iTunes, solve them with appropriate methods and fix the problem. Otherwise, you can grasp iTunes songs offline via MuConvert Apple Music Converter, then you can play M4P files without iTunes anymore.
Q. Where is My Downloaded Apple Music Stored?
A: By default, when you download Apple Music on Windows/Mac computers within the app, all downloads will be saved to an exact folder, which refers to:
Windows: “Music\iTunes\iTunes Media”
Mac: “Home/Music/”
However, even if you can access them, you can’t open and stream them with any installed media player because of Apple DRM. Instead, you will need MuConvert Apple Music Converter to unlock them first and convert them to common files of DRM-free formats like MP3. Then you can stream Apple Music downloads without any limitation.
Q. Where Can I Listen to Apple Music After Putting on USB?
A: Once you have put Apple Music on a USB, you can carry the stick everywhere and insert it into the devices with a USB port provided. For example, you can listen to Apple Music in the car by inserting it into the car stereo, or use your smart TV to stream the downloaded Apple Music playlists for having a party at home! Compared with installing the Apple Music app to stream the songs, it would be more convenient and flexible for you to download and put them on USB to enjoy offline!
Final Words
If you encounter any inconvenience while streaming Apple Music within the official platform, you can download and transfer Apple Music to USB to enjoy a more flexible playback experience. To do it, MuConvert Apple Music Converter is a must-have tool as you need to remove DRM from Apple Music songs first. Now, freely install the software and try it to free all Apple Music downloads and stream without limitations!
Convert Apple Music to MP3 Losslessly
Remove DRM from Apple Music songs and convert them to MP3 without quality loss.
More Posts
8 Best Apple Music Converter Detailed Review [App/Online] Read More » How to Remove DRM from Apple Music [New Updated!] Read More » How to Convert Apple Music to MP3 [2026 Updated] Read More » How to Convert M4P to WAV Lossless in 2025 [4 Ways] Read More »