Can you burn CDs from Apple Music? You may come up with such confusion while wishing to create personal collections to store all your favorite tracks from Apple Music. Nevertheless, this will actually be based on what types of Apple Music you own.
If you have purchased Apple Music from the iTunes Store, these resources can be directly burned to CDs from iTunes Library. But when it comes to streaming M4P Apple Music songs, they are encrypted with DRM and you will find it not possible to burn Apple Music to CD.
Therefore, based on different situations, all solutions collected in this post will correctly guide you to burn Apple Music to CD easily. Now, please scroll down and dive into reading.
For those who want to burn purchased songs from iTunes to CD, you can click here for steps to burn iTunes songs to CD. If you want to burn Apple Music playlist or songs to CD, keep reading for tools and steps.
4 Tools Needed to Burn Apple Music to CD
When it comes to burning a CD, you may find it confusing if you don’t know how to burn it or what tools are needed. Don’t worry. Here are all the must-have tools you will use when burning Apple Music to CD. Simply follow the list and get them well prepared:
- MuConvert Apple Music Converter: the software is a must. It can unlock DRM encryption to get Apple Music songs converted into MP3 and more CD-compatible audio formats.
Free Download 100% SecureFree Download 100% Secure
 - A blank CD: A disc is needed to keep the converted Apple Music as a collection.
- A CD drive: It is for inserting the blank CD. If your computer isn’t equipped with one, you need to prepare an external CD drive and plug it into your computer.
- A CD burner: iTunes, Windows Media Player, or any CD burning software that can burn songs to the CD.
Convert Apple Music to CD-compatible Formats Before Burning
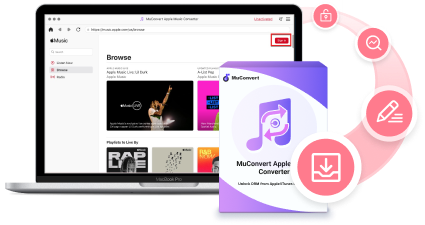
As mentioned, as Apple Music songs are protected by DRM in M4P, to burn Apple Music to CD, you will need to remove DRM protection from Apple Music and convert songs to CD-compatible audio formats first. Here, MuConvert Apple Music Converter is strongly recommended as an efficient tool to help.
With a built-in Apple Music web player, MuConvert Apple Music Converter allows you to directly access all music resources and your full library. Then you can convert all the songs to DRM-free MP3 and other CD-compatible formats. During the conversion process, the software will keep the original quality and also all ID3 tag information, allowing you to quickly manage and access the downloaded songs after CD burning and enjoy offline playback at the best 320kps quality.
- Remove DRM from Apple Music songs, playlists, albums, etc., to make them ready for burning.
- Offer 4 CD-compatible formats (MP3, M4A, WAV, and FLAC).
- Batch convert Apple Music playlists or your library at 20X speed.
- Guarantee original quality for best listening experience with CD.
- Keep all ID3 information with local files for managing your large music library with ease.
Designed with a user-friendly interface, MuConvert Apple Music Converter is also easy to use. Now, get started with removing DRM from Apple Music songs and burning Apple Music to CD easily.
Step 1. Install MuConvert Apple Music Converter
First, install MuConvert Apple Music Converter on your computer. It is recommended to try the free trial version before making a purchase. Launch the program, enter the main feed and log into your Apple Music account.
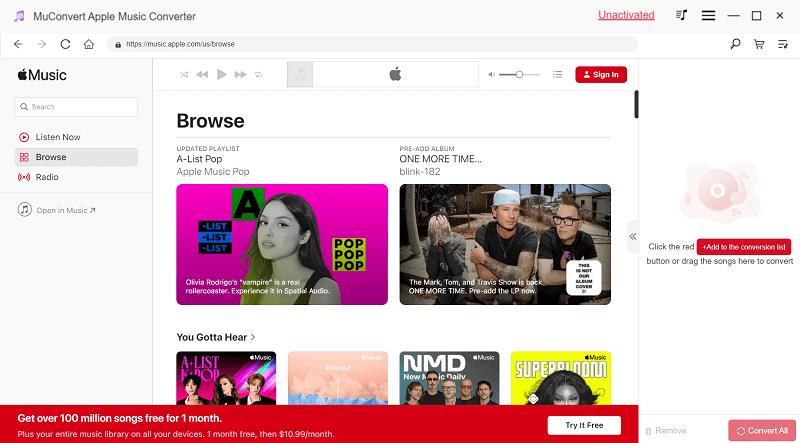
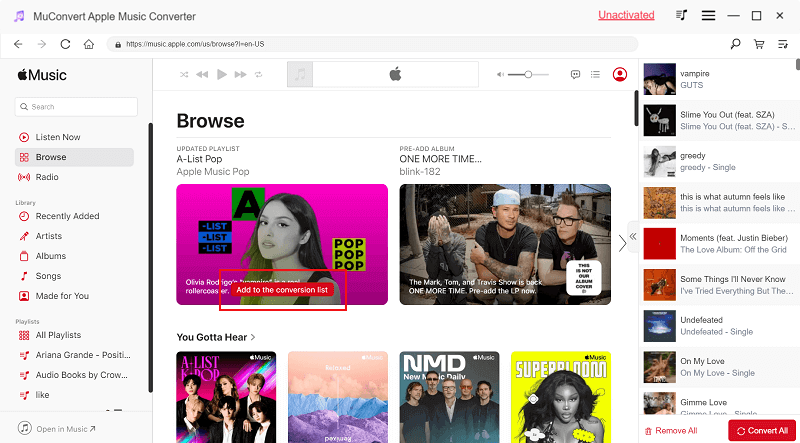
Step 2. Select Your Favorite Apple Music Songs/Playlists
When you enter the Apple Web Player, you need to sign in your Apple ID. Then you can directly drag and drop a song you like to the conversion button. If a playlist, open it, and click “Add to the conversion list” to remove DRM and convert their format without hassle.
Feel free to add tons of songs for conversion and DRM removal as the converter works at 20X speed to save time.
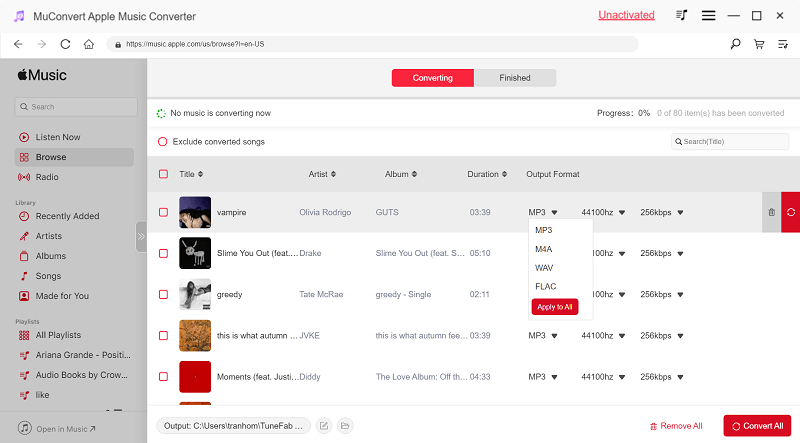
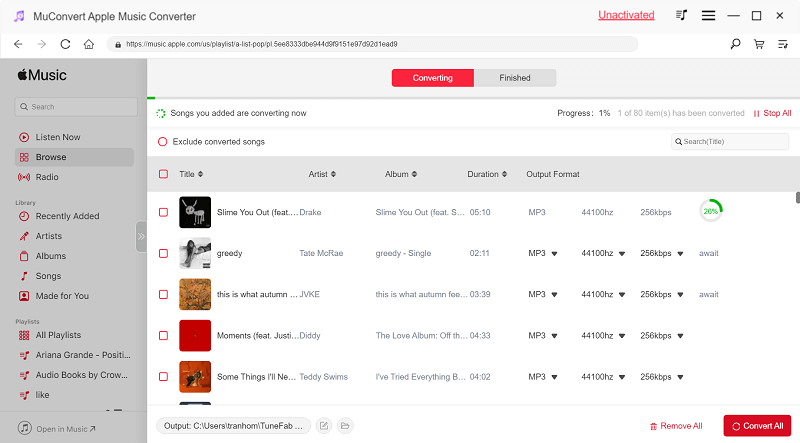
Step 3. Convert Apple Music to CD-compatible MP3 Format
Open the conversion list on the right side, choose “MP3” so that the Apple Music tracks will be converted to a CD-compatible format. If you prefer lossless quality, you can convert Apple Music songs to WAV. To keep them in MP3, also make sure to click “Apply to All”.
Step 4. Remove DRM and Convert Format
Click the “Convert” button. Within a minute, MuConvert Apple Music Converter removes DRM and converts these songs at 20X speed. Once it finishes, all Apple Music songs should be downloaded under the “Finished” module, and you can open the folder by directly clicking on the “View Output File” button.
When you have removed Apple Music DRM now, you are getting ready to burn Apple Music to CD. Next, move on to the operations to start burning Apple Music playlist via CD burners on Windows/Mac.
How to Burn Apple Music to CD on Windows (3 Free Ways)
Now that you have a DRM-free playlist converted from MuConvert in your local folder on Windows, you can easily burn it to a CD via 3 free CD burners: iTunes, Windows Media Player, and VLC. They are easy to use, and take no charge of burning music to CD on a PC. Now, check the steps below and see how to burn a Apple Music playlist and songs to CD.
Method 1. Burn Apple Music to CD with iTunes
More than being a media player and file manager, iTunes comes with a hidden feature to burn songs in its library to CD. If you already installed iTunes on Windows, you can make full use of it on your PC. Here’s how to burn a playlist to iTunes:
Step 1. Connect the external DVD drive to your computer, and insert a blank CD.
Step 2. Run iTunes and turn to “File” >> “Add File to Library…” to import the converted DRM-free Apple Music songs to iTunes Library. You ought to “create a new playlist” to save them.
Step 3. When the songs are imported, insert the blank CD disc into your computer to let iTunes detect it.
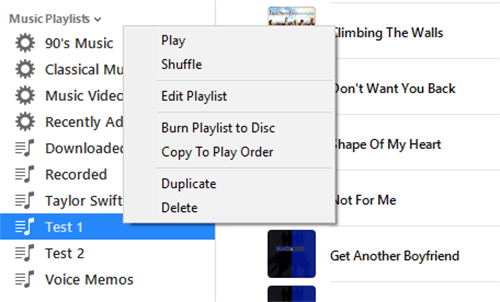
Step 4. Subsequently, as the disc is detected, return back to the created new playlist and right-click on it. Select the “Burn Playlist to Disc”option.
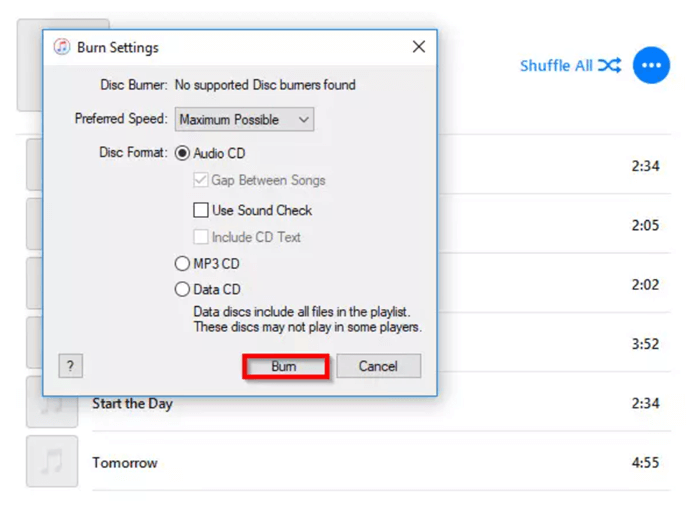
Step 5. In the pop-up dialogue, customize the burning speed, and select disc format as “Audio CD”. Subsequently, tap “Burn” to put songs from iTunes to the CD.
Method 2. Burn CDs from Apple Music with Windows Media Player
If you want to burn Apple Music to CD without iTunes, you can turn to the default app – Windows Media Player. It actually provides a CD-burning function. After you get the DRM removed Apple Music songs in the local folder, directly opening Windows Media Player and burning the songs to a blank CD can save time installing a third-party CD burner. Here’s how to burn Apple Music songs to a CD:
Step 1. Insert a CD-RW disc into your Windows computer and run Windows Media Player to detect it.
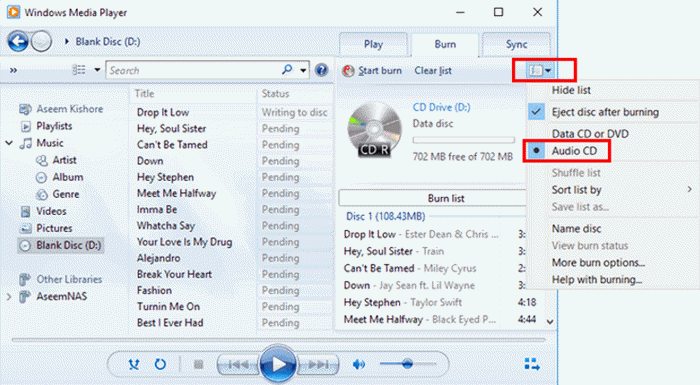
Step 2. Turn to the Burn tab in the right workplace, then import the converted Apple Music songs to the burning list.
Step 3. Subsequently, click the Menu icon on the right panel and select “Audio CD” as the burning pattern.
Step 4. Tap the “Start Burn” button to start burning Apple Music to CD on Windows.
Method 3. Burn CDs from Apple Music with VLC
While VLC is known as an open-source media player, it can be helpful when buring Apple Music to a CD. Compatible on both Windows and Mac, VLC is also free to use. Now let’s burn CDs from Apple Music playlists and songs on your PC.
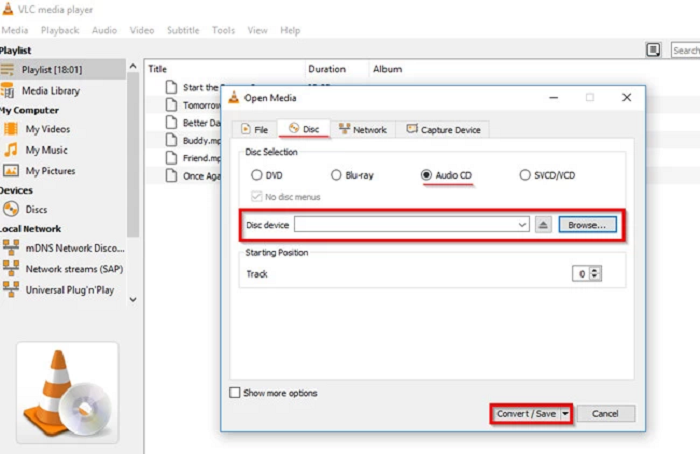
Step 1. Download and launch the VLC player on your computer. Insert a blank CD into the disc drive.
Step 2. Go the “Media” menu in the upper left corner and choose “Convert/Save” from the drop-down list.
Step 3. An “Open Media” window will pop up. Click the “Disk” tab and check the “Audio CD” box. Click “Browse” to select the CD drive. Click “Convert/Save”.
Step 4. When the “Convert” window appears, click the tool icon to choose MP3 as the desired format and click Save.
Step 5. Click “Browse” and choose the folder that stores converted DRM-free Apple Music songs. Now you can choose songs you want to keep on the CD. The final step is to hit the Start button to burn Apple Music songs into a CD.
How to Burn Apple Music to CD on Windows (2 Easy Ways)
Similarly, it is not tough at all to burn CDs from Apple Music on Mac. There are 2 free solutions, Apple Music and Burn App, functioning to help you burn Apple Music to CD. Now, please dive into reading and master how they can help respectively.
Method 1. Burn Apple Music to CD with Apple Music
Since you already subscribed to Apple Music and have got Apple Music songs as local files, you can make use of Apple Music. (If your Mac is running macOS Catalina or former, use iTunes on Mac or Windows instead.) The music service allows you to import local music files to the platform. Here’s how to burn a CD from Apple Music:
You can only burn local Apple Music files converted with MuConvert Apple Music Converter to CD with the Apple Music app. For those encrypted streaming songs on the service, you can’t directly burn them to CD.
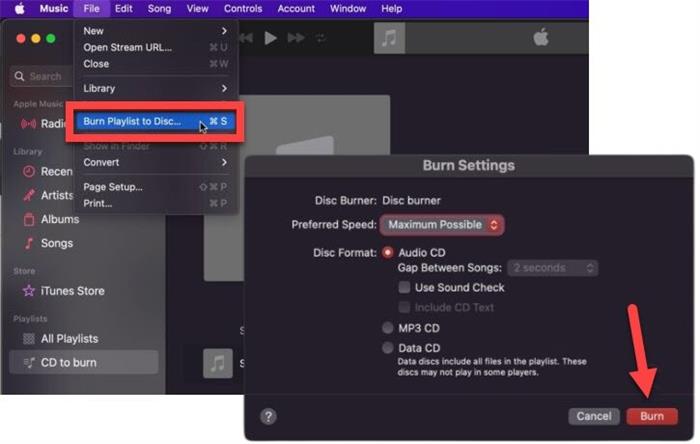
Step 1. Run the Apple Music app on Mac. Please turn to “File” >> “Add to Library” to select uploading the converted DRM-free MP3 Apple Music files to iTunes Library first.
Step 2. Click on “File” >> “New” >> “Playlist” to place them in a single playlist and get ready for Apple Music to CD burning.
Step 3. Insert a blank disc and also access the newly-created playlist in iTunes. Right-click on it and select “Burn Playlist to Disc”.
Step 4. In the “Burn Settings” window, adjust the burning speed and also select the burning type as “Audio CD”. Finally, click on “Burn” to burn Apple Music to CD in no time.
Method 2. Burn Songs from Apple Music to CD with the Burn App
Another free program that helps burn Apple Music to CD on Mac is the Burn App (compatible with macOS 10.9 or higher). This program can retain ID3 information for burned songs for easier management on CD discs. Follow the steps below to burn Apple Music songs to CD:
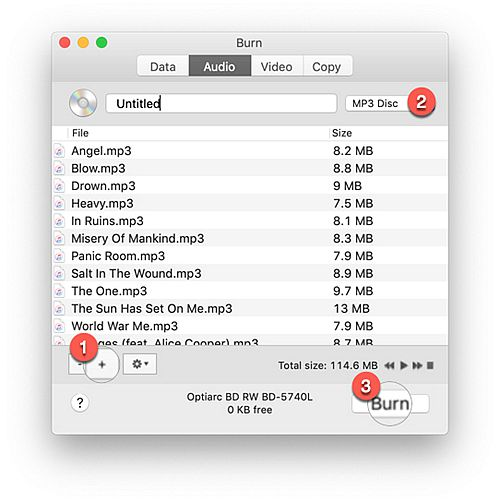
Step 1. Insert the CD disc into an external CD drive, as Mac is not equipped with an internal CD reader.
Step 2. Run the Burn app, and it will automatically detect the disc. You ought to select “Audio” and tap the + button to import the converted Apple Music songs to the application.
Step 3. Please name the disc now. Also, on the right side of the editing space, you can select the “MP3 disc” or “Audio CD” as the CD option to burn the songs.
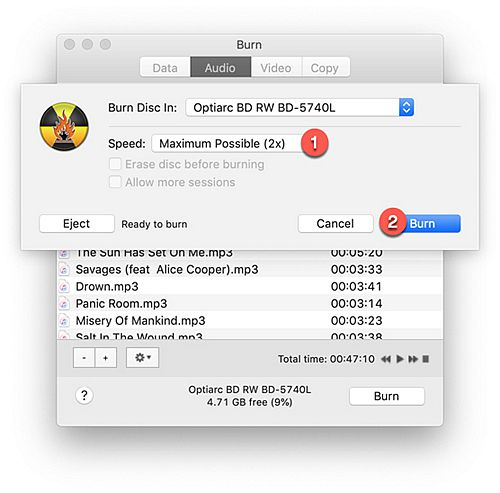
Step 4. Subsequently, tap “Burn” and a new dialogue will pop up to select the burning speed and quality for retaining the songs. Please customize the options and confirm “Burn” to proceed to burn the Apple Music songs to the CD disc.
FAQs About Burning Apple Music to CD
If you run into any trouble while trying to burn Apple Music to CD, please also check these frequently asked questions and figure them out.
How to Burn Purchased Apple Music to CD?
When you have purchased Apple music from the iTunes Store, it is recommended to burn it to CD within iTunes directly. Songs bought from iTunes after 2009 are DRM-free and they can be easily burned for unlimited times. But if you got songs purchased before 2009, you need to be aware that they can only be burned 7 times. If you add them to the same playlist with other DRM-free songs, the playlist will fail to be burned after being burned 7 times.
Normally, the songs you bought will be in your iTunes library. You can follow the steps of burning Apple Music to CD with iTunes to add them to a playlist and burn them to CD. If you can’t find them, go to the iTunes Store and find your purchase. Then you can redownload and burn Apple Music to CD with simple taps.
Which Type of CD is Best for Burning Music?
If you would like to play the CD on stereo systems like car stereo, it is recommended to use CD-R discs. It also can be played on computer or an MP3 CD player. For those who just want to play CD on computers, you can also go with CD-RW discs.
How Many Songs Can You Burn Onto A CD?
Generally, the capacity of the CD disc greatly determines the number of songs you can burn onto it. For an audio CD equipped with 650MB storage space, you can store about 74 minutes of music (around 150 MP3 files) on it. Therefore, if you wish to save more music files on a single CD, you will need a disc with a larger capacity.
Conclusion
That’s all about 5 ways to burn Apple Music to CD. For burning M4P Apple Music songs encrypted with DRM, you will need to decrypt DRM with a professional third-party DRM removal program first. In this case, MuConvert Apple Music Converter has you covered. With its powerful DRM removal function and 4 CD-compatible formats, you can save your favorite Apple Music songs in local DRM-free audio files. With it, burning Apple Music to CDs is a breeze. So why not download it and enjoy Apple Music songs on CDs right now?
Convert Apple Music to MP3 Losslessly
Remove DRM from Apple Music songs and convert them to MP3 without quality loss.
More Posts
8 Best Apple Music Converter Detailed Review [App/Online] Read More » How to Remove DRM from Apple Music [New Updated!] Read More » How to Convert Apple Music to MP3 [2026 Updated] Read More » How to Convert M4P to WAV Lossless in 2025 [4 Ways] Read More »