Family Sharing is an excellent feature that unites your family of up to 5 members together and shares access to a variety of Apple services including Apple Music, Apple Books, Apple New, and so on. However, you may come across a few Apple Family Sharing problems. For example, Apple Music doesn’t work with Family Sharing.
To help you get rid of such a nuisance, you might as well try out the following 7 workarounds to solve the Family Sharing Apple Music not working issue and learn how to share Apple Music without Family Sharing in this post.
Related Article:
MuConvert Apple Music Converter: Better Than You Expected
Why is Your Apple Music Not Working on Family Sharing?
When you discover your Apple Music not working on Family Sharing, consider whether you are running into the following situations that would probably lead to the occurrence of the error:
- The Apple Music subscription plan you’ve joined is a trial version. When it expires, you are not allowed to access the Family sharing feature anymore.
- Check whether you have signed in with another Apple ID, thus leading to the Family Sharing Apple Music not working problem.
- You are using an outdated iOS model which is not compatible with the Family Sharing feature, so the Apple Music Family Sharing not working issue happens.
…
Next, go through the 7 detailed guidance guiding you on how to resolve the Family Sharing Apple Music not working error and select the most appropriate to help yourself out of the trouble.
Solution 1. Check the Apple ID on Your Device
Your Apple Music Family Sharing not working might result from a mistake when the organizer was adding the Apple IDs of family members to the Family Sharing feature. What’s more, you could be using another Apple ID that is not invited to Family Sharing. That’s why you fail to share Apple Music with Family Sharing. To avoid scenarios like these, the easy fix is to check out whether you have used the Apple ID invited to join the Family Sharing plan in advance to log in Apple Music. Here’s how.
STEP 1. Open the Settings app on your iPhone/iPad.
STEP 2. Tap [Your Name] on the top to see more information.
STEP 3. Check out whether the Apple ID is correct as the one in Family Sharing.
Optional Step. You can scroll down to the bottom and then Sign Out. Later, sign back into your Apple ID to see whether the glitch is now resolved.

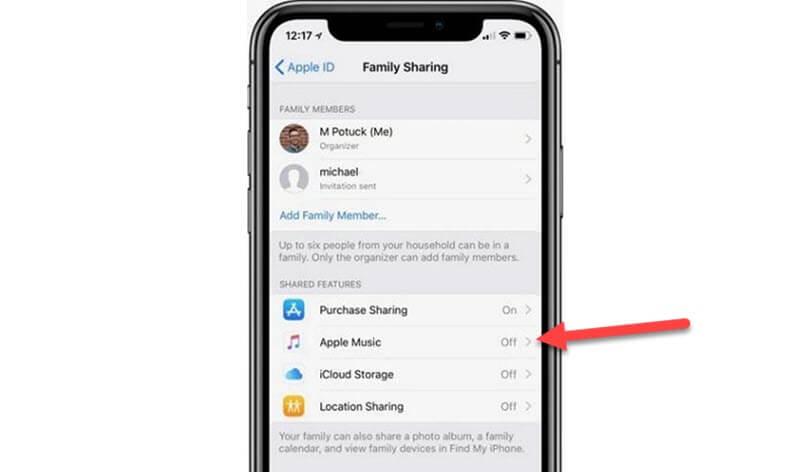
Solution 2. Check Apple Music in Share Feature
Another possible cause of the Family Sharing Apple Music not working issue is that the Apple Music feature is disabled in Family Sharing settings, and you therefore cannot share your favorite tunes with your beloved families through Apple Music. In this case, you simply need to check out whether it is off at present by following the steps on your device and on the device with which you want to share Apple Music.
STEP 1. Go to Settings on your iOS device.
STEP 2. Tap [Your Name] to see your Apple ID account.
STEP 3. Scroll down to the Family Sharing feature.
STEP 4. See whether the Apple Music option is off in SHARED FEATURES. If so, toggle it on.
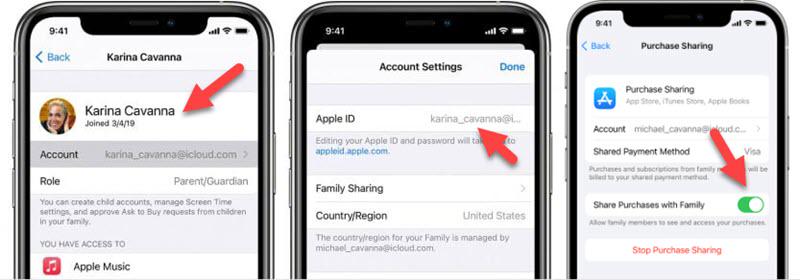
Solution 3. Check Your Family Sharing Settings
Also, you should ensure that you have logged in with the same Apple ID for both the Family Sharing and Media & Purchases features at the same time, and also with the Family Sharing functionality turned on. If you have disabled the feature, for sure you are not able to access its service at all. Here are the steps you can follow to double-check:
STEP 1. Launch the Settings app on your device and tap on [Your Name].
STEP 2. Select Family Sharing, and tap on [Your Name]. You should note down the Apple ID if needed.
STEP 3. Go back to your Apple ID, and navigate to Media & Purchase. Then, select View Account to check whether the Apple ID is the same in your Family Sharing. If not, log in to the same account.
STEP 4. Now, navigate back to Settings – [Your Name] – and choose Family Sharing.
STEP 5. Tap Purchase Sharing, and see whether the Share Purchases with Family option is toggled on. If not, you should enable this option, since you need to share the Apple Music Family plan with your families.
Solution 4. Check Your Country Setting
Another important factor that may affect Apple Music Family Sharing not working should be the country setting. When your account is not set to the same country as the one that subscribes to the Apple Music plan and crates the Family Sharing group, you will fail to access this feature. Hence, you also need to check if your country’s setting of your Apple ID is not the same as the one set for the Family Sharing group.
Solution 5. Sign out and Sign into Your Apple Music Account
Sometimes your Apple Music account may get corrupted, because you have logged into multiple devices at the same time, thus leading to the Family Sharing Apple Music not working at all. To resolve this, you are able to log out of Apple Music ID on all your devices, and then sign back in to turn on Family Sharing again. Normally, the error can be fixed after this operation.
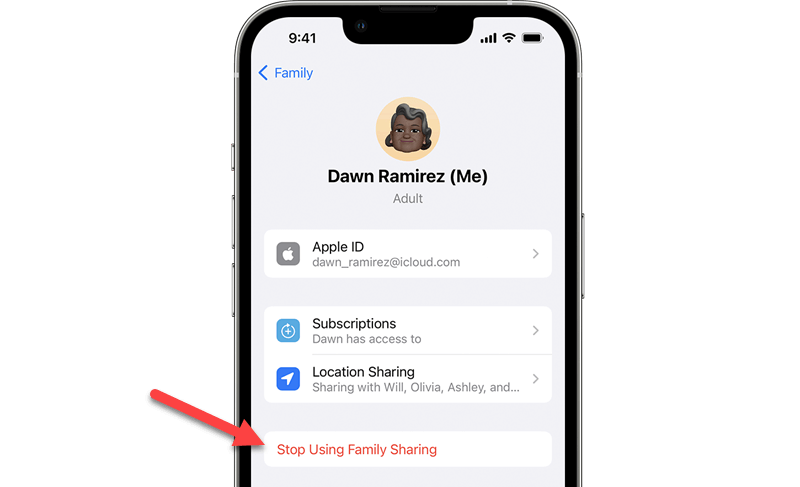
Solution 6. Leave and Join Family Group Again
As mentioned above, the Apple ID should match the one in the Family Sharing group so as to share and stream Apple Music songs among family members. If you already confirm that the Apple ID is correct and the Apple Music option is already enabled. Then, this Apple Family Sharing not working issue may be caused by some cache or synchronization problems. You may thus try to remove the Apple ID and then add it back to the Family group.
STEP 1. Open Settings > [Your Name] on your iPhone/iPad.
STEP 2. Select Family Sharing from the menu.
STEP 3. Tap [Your Name] and choose the Stop Using Family Sharing option.
STEP 4. Now, ask the organizer to add your back to the Family group.
Solution 7. Turn to Apple Music Support
You should note that Apple Music Family Sharing is not available on all iOS devices, and its activation follows certain rules.
If one of the family members is using the free trial or an individual plan of Apple Music, it’s impossible for an organizer to share Apple Music with him/her in Family Sharing. Also, this feature currently works on an iPhone/iPad running iOS 8 or later, or a Mac using OS X Yosemite or later. If your device has not been updated for a long time, you may need a software update on your device.
When you have tried all the above methods but still find Apple Music Family Sharing not working on your devices, you may need to seek more professional help from Apple’s technical support team. Simply reach them and demonstrate your problem, then they will reach back to you and help solve your problem as soon as possible.
If possible, you can also go to the local Apple Retail Stores for help.

Bonus Tip: How to Share Apple Music Without Family Sharing?
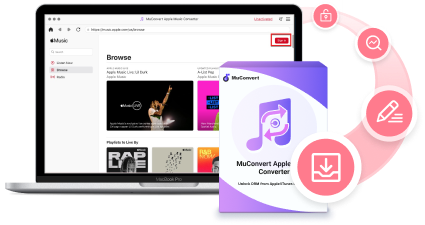
Despite the above common solutions to fix Apple Music Family Sharing not working, you can use a third-party program to download Apple Music songs to enable direct offline music sharing, without going through this feature at all. To process this, instead of using the official music download feature offered towards Apple Music subscribers, you are able to turn to the powerful software, MuConvert Apple Music Converter to help.
MuConvert Apple Music Converter enables a convenient Apple Music download function, by directly embedding the Apple Music web player for free music selection and direct music download, it boosts higher flexibility in offline music streaming. The Apple Music downloads will be preserved in DRM-free files of mainstream formats such as MP3, M4A, etc. Then, you are able to directly share the music downloads with others, even without joining the Family Sharing group at all. With this tricky way, it can efficiently solve Family Sharing Apple Music not working error for you.
-
Convert Apple Music to MP3 – This software has an embedded Apple Music web player, which can convert the whole music library in Apple Music to DRM-free MP3, such as Playlists, Albums, and Podcasts. The downloads will be saved on your desktop for good.
-
Keep Lossless Sound Quality – To ensure the best listening experience, Sharing. MuConvert Apple Music Converter enables lossless audio quality of a bitrate in up to 320kbps and a sample rate in up to 48kHz.
-
Convert at 10X Ultra Fast Rate – MuConvert Apple Music Converter can take advantage of CPU and GPU to accelerate the whole conversion process up to 10X faster than ever.
-
Download Unlimited Songs – There is no limit to downloading music from Apple Music to your Windows and Mac. Moreover, you can download multiple songs at once to save your precious time. More importantly, they can be preserved offline permanently even you cancel Apple Music premium subscription!
-
Save ID3 Tags and Metadata – MuConvert Apple Music Converter can keep ID3 tags and metadata info such as title, artist, album, genre, album art, and so on during the whole process for easy management afterward.
-
Easy-to-Go User Interface – This intuitive software comes with an in-built web browser that enables you to directly download one song or the whole playlist/album/podcast with your finger.
The whole procedure is as easy as ABC and you’ll get it done in 3 steps. Let’s see how MuConvert Apple Music Converter works here to help you get Apple Music downloads for more convenient music sharing and playing offline without using Family Sharing feature at all.
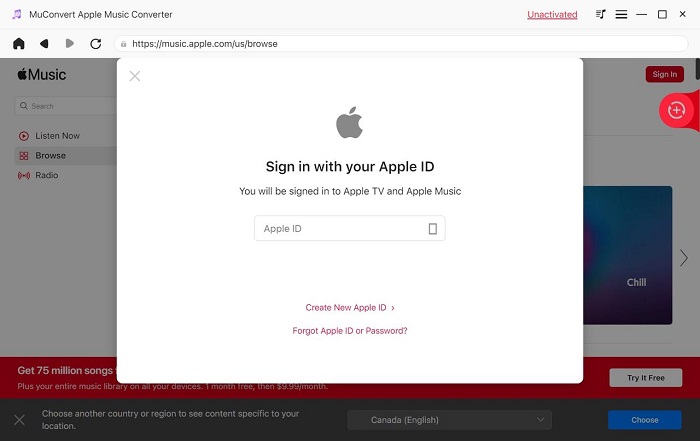
STEP 1. Log in to Apple Music
First off, you need to download and install MuConvert Apple Music Converter on your computer. Then, launch it from your desktop. You’ll need to log in to your Apple Music account so that the program can access the music library.
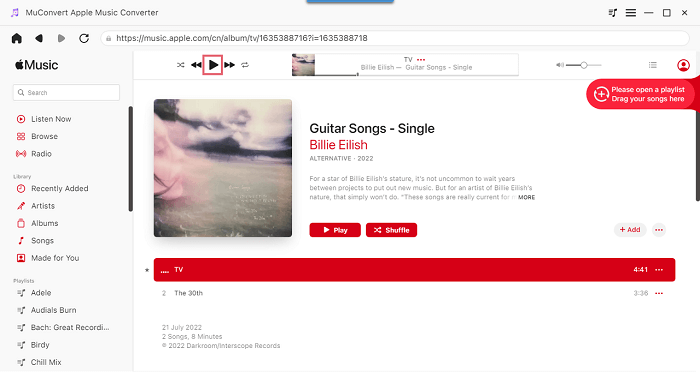
STEP 2. Search for Favorite Songs
Now, click Open the Apple Music web playerto start. You’re able to search for the songs you want to download, or directly download your personal playlist. If you want to keep the best sound quality, go to Preferences – Advanced and modify the parameters.
- To download a single song, drag the song to the Red Plus icon.
- To download multiple songs in the same playlist/album, click on the Red Plus button in the playlist/album.
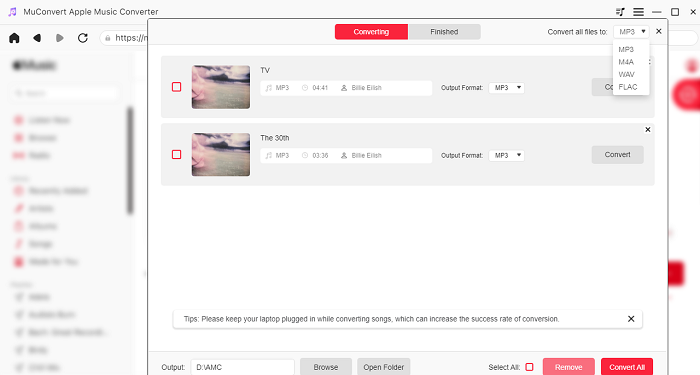
STEP 3. Download Apple Music Songs
After the program finishes fetching data from Apple Music, you’ll see the feeds listed on the screen. You should select the desired songs and click Convert All to start downloading Apple Music to your Windows or Mac. Then, the downloads will be saved in the Finished tab when completed. You can click View Output File to quickly locate the music files.
Now that the downloads are stored on your computer, you can share them with your family members via emails, Dropbox, or social applications in case your Apple Music doesn’t work with Family Sharing. What’s better, the downloads will be available when both your Family Sharing plan and Apple Music Family plan expire or are canceled. Don’t you think MuConvert Apple Music Converter is a more flexible way to save and share your favorite Apple Music songs? You might as well try it out now.
FAQs About Apple Music Family Sharing Not Working?
Now, also grasp more FAQs that most users would care about while using the Apple Music Family Sharing feature.
Q1: How to Join Apple Music Family Plan?
A: To sign up for Apple Music Family plan, simply tap your profile in Apple Music, then select “Join Apple Music” > “Family Plan” > “Join Apple Music”. Once the billing process complete, you can successfully activate Apple Music Family Plan. Next, turn on Family Sharing in “Settings” to invite your family members to join!
To learn more details about Apple Music Family Plan, such as its sunscription price or the benifits you can enjoy from it, you can move to this article: How Much Is Apple Music Family Plan? How Can I Get It?.
Q2: How to Invite Members to Apple Music Family Sharing
A: To invite a family member to Apple Music Family Sharing group, simply navigate to “Settings” > tap [Your name] > “Family Sharing” > “Set Up Your Family”. Next, select “Invite People” and directly select the contacts for sending an invitation message to he/she through SMS, they are able to join the plan once accept the invitation.
Conclusion
When you also encounter with the Apple Music Family Sharing not working error, you are able to find the proper solutions in the blog to get it solved. An ultimate way to overcome such a problem and to download Apple Music songs offline as DRM-free MP3 files is also recommended. You are also able to install MuConvert Apple Music Converter and try the service for free now!
Convert Apple Music to MP3 Losslessly
Remove DRM from Apple Music songs and convert them to MP3 without quality loss.
More Posts
8 Best Apple Music Converter Detailed Review [App/Online] Read More » How to Remove DRM from Apple Music [New Updated!] Read More » How to Convert Apple Music to MP3 [2026 Updated] Read More » How to Convert M4P to WAV Lossless in 2025 [4 Ways] Read More »