The DRM-protected AAC files from iTunes or Apple Music often confine us to using them solely within the Apple-authorized ecosystem. Unfortunately, this limits our ability to share these files or enjoy them across various platforms. However, there’s good news – several methods exist to convert these protected AAC files to MP3, liberating your music for playback on any device and easy sharing across social media platforms.
In this post, we’ll explore four of the simplest and most effective methods to convert these protected AAC audio files into the widely compatible MP3 format. By doing so, you’ll unlock the potential of your music library, allowing seamless access and enabling you to share your favorite tunes effortlessly. Let’s delve into these methods and empower your music collection with versatility and accessibility.
What Is a Protected AAC Audio File in iTunes?
Protected AAC (Advanced Audio Coding) files were a type of digital audio file sold on the iTunes Store in the past. These files were protected by Apple’s FairPlay DRM, which restricted the usage of the files to specific devices and accounts, preventing unauthorized copying or sharing. That’s why people are looking for a way to convert protected ACC files to MP3 with a great helper like MuConvert Apple Music Converter.
However, after April 2009, Apple phased out DRM for music on the iTunes Store, making all music available in a more flexible and widely compatible DRM-free format, allowing users to play their purchased music on any device or platform that supports AAC.
If you don’t know how to identify the protected AAC files and the unprotected ones, just scroll down to learn whether the song is protected or unprotected within iTunes.
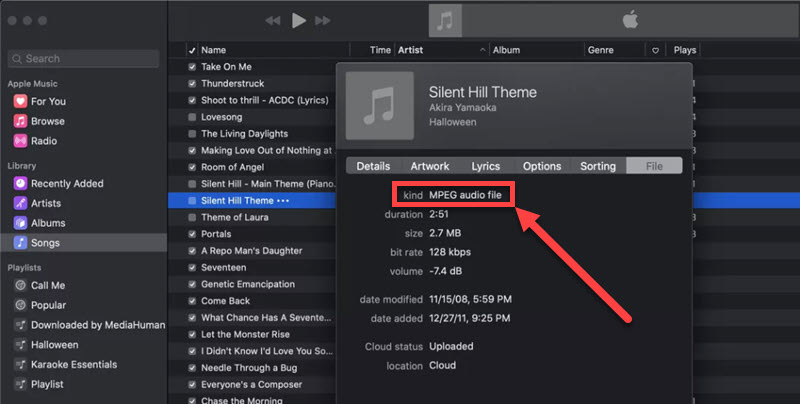
How to Check the Audio File Type of Your Songs in iTunes?
It’s easy to check the audio file type in the iTunes library with iTunes (Windows or macOS 10.14 and before) or the Apple Music app (macOS 10.15 and later). The steps are basically the same. Now, follow the tutorial below and check it out.
Step 1. Launch iTunes or Apple Music and go to “Library > Songs” on the left.
Step 2. Right-click on the audio and select “Get Info/Song Info”.
Step 3. Switch to the “File” tab and you can see the “kind” of your audio file.
1. Convert Protected Apple Music AAC to MP3 with MuConvert (Easiest)
The most well-known audio resources encoded in the protected AAC format can definitely be Apple Music. To bypass obstacles brought by DRM encryption and convert Apple Music protected AAC to MP3, you will definitely need a third-party decrypting program. Here, MuConvert Apple Music Converter brings you the most effortless help.
MuConvert Apple Music Converter directly integrates the official Apple Music player inside the program, allowing you to access full music database or your own Apple Music library, in order to strip DRM encryption and convert them to MP3 or other DRM-free formats as local files with only several easy taps. The program adopts advanced algorithms to guarantee lossless audio effects while resolving the audio conversion. In addition, it will retain full metadata information accompanying the music download at the same time.
In addition, MuConvert Apple Music Converter also utilizes hardware acceleration techniques to deliver much faster music conversion performance. To resolve batches of Apple Music to MP3 downloads, it can accelerate to 35X faster, greatly saving your time. Overall, MuConvert Apple Music Converter offers you the simplest way to get rid of Apple Music restrictions by converting protected AAC files to MP3, letting you enjoy more flexible offline playback on all devices even after canceling Apple Music subscription.
- All Catalog Covered – Download songs of all genres, albums, and playlists from Apple Music.
- 35X Ultra-Fast Rate – Take only a few minutes to download tens of songs or the entire album/playlist.
- Batch Download – Download multiple songs from Apple Music with an unlimited amount.
- Various Output Formats – Convert Apple Music to MP3, WAV, M4A, or lossless FLAC over the cloud.
- High-Res Music Quality – Support lossless quality of up to 320kbps and 48kHz for the best listening.
- Built-in Apple Music Web Player – Directly browse, download, and listen to music without installing iTunes or the Apple Music app.
With its default web browser connected to Apple Music, it cannot be easier to get started with MuConvert Apple Music Converter. Now, let’s learn how to convert AAC to MP3 without iTunes from Apple Music.
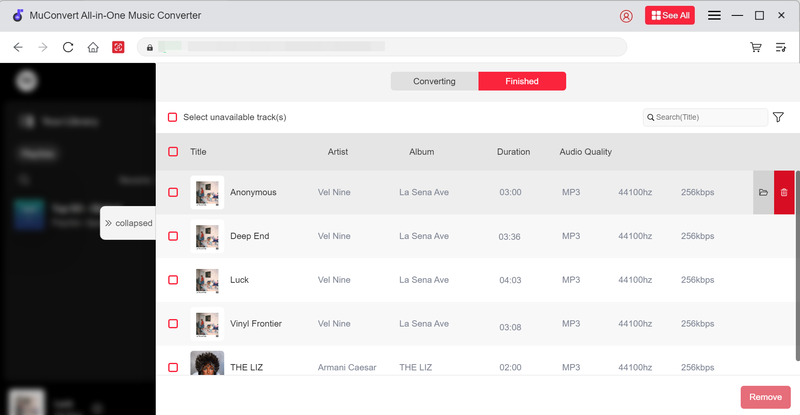
Step 1. Log in to the Embedded Apple Music Player
Once install MuConvert Apple Music Converter on your computer, open it and choose Apple Music to enter the built-in web player. You are required to sign in with your Apple credentials in order to select and add AAC music resources to convert.
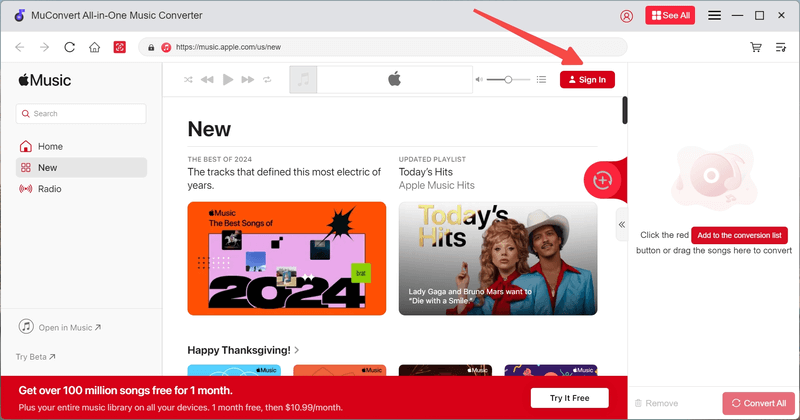
Step 2. Select Protected Songs to Convert
In the built-in Apple Music player, you are able to search for your favorite songs, albums, or playlists that you’d like to download offline. Once accessing them, directly drag to the Converting window floating on the right side. Directly tapping the Add to the conversion list button on the thumbnail of the album/playlist/song art cover can also add all songs to the conversion list at once.

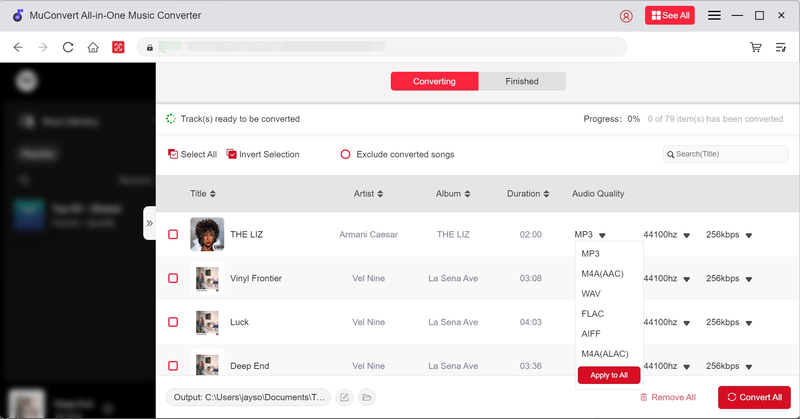
Step 3. Configure Audio Parameters
Once all songs are added, you can turn to the Converting window to further personalize audio parameters before proceeding with the music conversion. The Output Format, Bitrate, and Sample Rate can all be customized here according to requirements. So please select MP3 as the format to export converted AAC songs, and also determine the streaming quality as you require.
Step 4. Convert Protected AAC to MP3
Eventually, simply tap the Convert All button to start converting protected Apple Music AAC songs to MP3 instantly. MuConvert Apple Music Converter will resolve the conversion in batches quickly for you. Wait for a short moment and you can access the local files for playing offline regardless of what devices or media players you are using.
2. Convert Protected AAC Audio Files to MP3 with iTunes Match
iTunes Match was a service offered by Apple that allowed users to store their music in iCloud, matching songs in their library with those available on the iTunes Store. If a match is found, it will be upgraded from older and lower-quality tracks to higher quality (256kbps AAC) without DRM restrictions. Through this way, you can get the protected AAC files unlocked and then converted to MP3 format. Go ahead with the following steps after getting the DRM-free AAC songs.
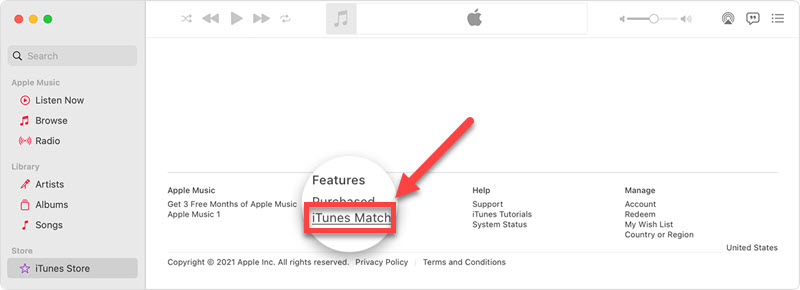
Step 1. Subscribe to iTunes Match
First off, open the Apple Music app on Mac, or iTunes on Windows PC.
- For Macs, click “iTunes Store” on the left.
- For Windows, click “Store” at the top.
In the iTunes Store, scroll down to the bottom and select “iTunes Match“. Now, click the “Subscribe” button and log in to your account. After filling up the bill, your subscription will be eligible.
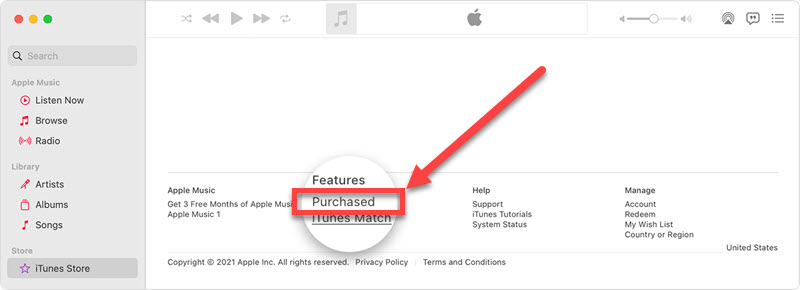
Step 2. Download Purchased Music from iTunes Store
Next, open iTunes for Windows or Apple Music for Mac on your computer.
- For Macs, switch to the “iTunes Store” on the left sidebar.
- For Windows PC, select “Music” first and then click “Store”.
Scroll to the bottom and click “Purchased”. You can now download the purchased music from the cloud. Please be aware that purchased songs before April 2009 will be downloaded in M4P while in M4A after April 2009. Since M4A is a DRM-free audio type, you can directly convert M4A into MP3.
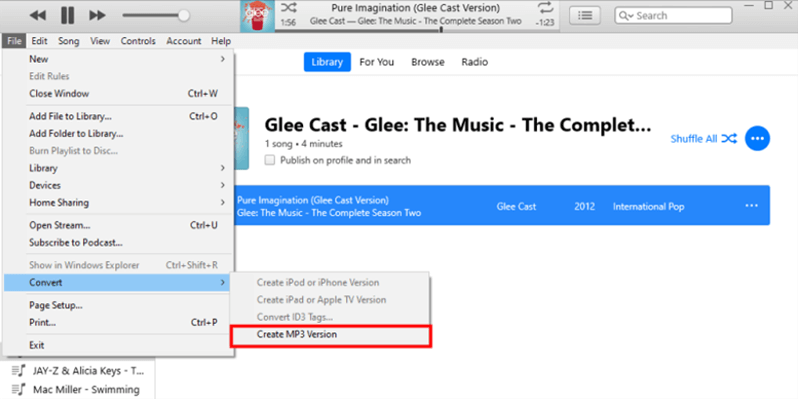
Step 3. Convert Protected AAC Audio File to MP3
- Now, go to “Edit > Preferences > General > Import Settings” on iTunes for Windows or Apple Music for Mac.
- After that, set “Import Using > MP3 Encoder” and “Setting > Custom”.
- Then adjust the parameters for high fidelity.
- Last, select the protected AAC song and navigate to “File > Convert > Create MP3 Version”.
This will convert M4P to MP3 and a new copy will be under the source.
3. Convert Protected AAC to MP3 Format by Burning It to CD
Apart from the above methods, you can also convert the AAC files with DRM to MP3 using a burned CD with iTunes. This built-in functionality within iTunes ensures a cost-free conversion process. But remember that only iTunes-purchased songs can be burned to MP3 through CD in this way.
Here’s a general outline of the steps to burn DRM-protected AAC songs to a CD using iTunes:
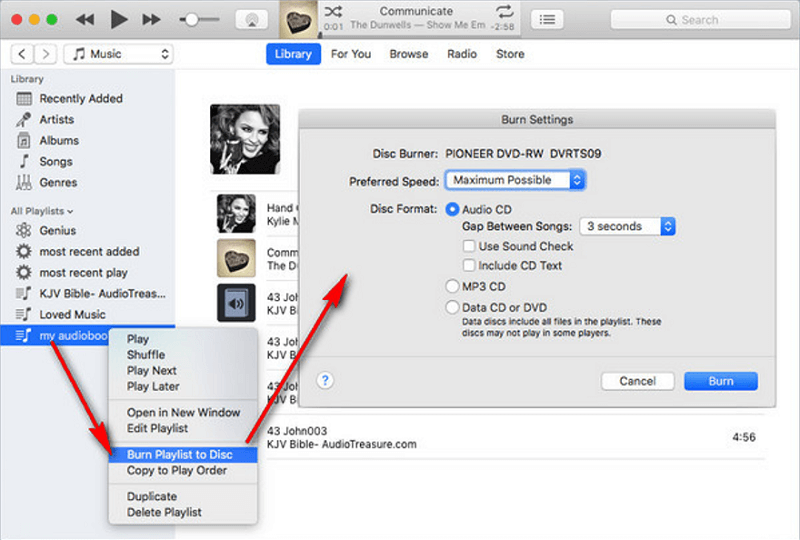
Step 1. Create a new playlist in iTunes and add all the protected AAC files you wish to burn to CD to the playlist.
Step 2. Subsequently, insert the blank CD into the computer, and select the playlist to burn to the CD.
Step 3. Select the playlist you created, then click “File > Burn Playlist to Disc”. Follow the prompts to select the burning settings and start the burning process.
Step 4. Once burned, utilize iTunes to put the converted MP3 songs from the CD using the MP3 encoder again, and you can get the AAC files converted to MP3 files.
4. Convert Protected AAC Files Online Free
Today, there are also some free online tools that can resolve protected AAC conversion, allowing you to get DRM-free MP3 audio files even without installing any third-party program. FreeConvert AAC to MP3 Converter is such a web-based service you can refer to for help. It is well compatible with all mainstream browsers, to deliver you a smooth experience in converting protected AAC files to MP3.
You can upload multiple files to process the conversion simultaneously to facilitate higher efficiency. Nevertheless, the converter only supports max file size at up to 1GB if you only use its free version.
However, online tools will present comparatively slower success rate to convert AAC to MP3 due to unstable network connections. For higher stability and conversion efficiency, you are recommended to install MuConvert Apple Music Converter to help.
In the following, please check the manipulation guide and follow it to proceed with the AAC to MP3 conversion step by step:
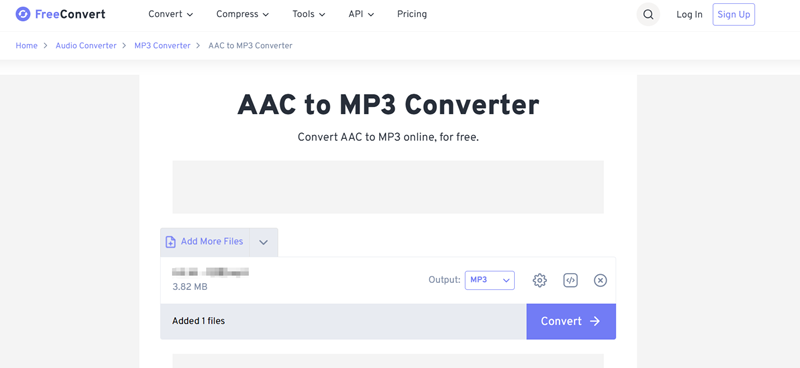
Step 1. In a web browser, open a new tab and go to FreeConvert AAC to MP3 Converter.
Step 2. Directly drop the AAC files into the conversion box, subsequently, tap the Convert button and the converter will proceed with the format conversion for you instantly.
Step 3. When the conversion is over, the converted MP3 files will be prepared. Please click on the Download button to save them offline.
Comparison of the 4 Methods
Now, you can walk through the following comparison chart to sort out the best method from the 4 to quickly convert protected AAC files to MP3:
| Output Quality | Conversion Speed | Success Rate | Easy to Use | Price | |
|---|---|---|---|---|---|
| Using MuConvert Apple Music Converter | Lossless | Fast | High | Yes | Free trial available (starts from $29.95) |
| Using iTunes Match | Lossless | Medium | Medium | Yes | Starts from $24.99 |
| Using CD | Lossless | Slow | Medium | No | Based on the prices of buying a physical CD disc |
| Using FreeConvert | Compressed | Medium | Low | Yes | Free (with limitations) |
Overall, if you want to ensure high stability, good efficiency, and lossless quality to convert protected AAC files to MP3, selecting MuConvert Apple Music Converter should be the priority. iTunes Match is better for dealing with songs purchased from iTunes Store. Although FreeConvert is free and convenient to use, its limitations and unstable connection performance can be annoying sometimes. Based on your requirements and select the best method to get started now!
FAQ About Protected AAC
What Are the Commonly Used Audio File Types in the iTunes Library?
Depending on the source of audio, there are a few common types of audio files in the iTunes library. Some of them may be identical with slight distinctions. You might as well have a look at the following.
| Encoder | Source | |
|---|---|---|
| AAC Audio File | A standard AAC file | Convert audio or rip songs from a CD with iTunes’s default AAC encoder. |
| MPEG Audio File | A classic MP3 file | Convert audio or rip songs from a CD with iTunes’s default MP3 encoder.Download from any website. |
| Matched AAC Audio File | A special AAC file | Download from iCloud via iTunes Match. |
| Apple Music AAC Audio File | An exclusive AAC file | Download from the Apple Music streaming service. |
| Protected AAC Audio File | A DRM-restricted AAC file | Download purchased songs from iTunes Store prior to April 2009 with DRM protection. |
| Purchased AAC Audio File | A free or protected AAC file | Purchase and download songs from iTunes before or after April 2009. |
Why Can’t Common Tools Convert DRM-Protected AAC Files?
Common tools often can’t convert DRM-protected AAC files due to several reasons:
- Legal Restrictions: Converting DRM-protected files might violate copyright laws or the terms of service set by content providers. Common tools might refrain from providing features that could potentially breach legal boundaries.
- Technical Limitations: Common tools might lack the necessary mechanisms or authorization to decrypt or remove DRM protection from files.
- Security Concerns: Removing or bypassing DRM protection might introduce security vulnerabilities or risks of piracy, which common tools aim to avoid.
Why Can’t I Convert AAC to MP3 in iTunes?
To create an MP3 version for your purchased AAC files in iTunes, you need to ensure that the songs have been downloaded on your computers in advance before processing the AAC to MP3 conversion. Otherwise, the “Create MP3 Version” button will grey out and you will fail to convert AAC to MP3 successfully.
To download iTunes purchased AAC songs and convert them to MP3, simply follow the procedures below:
Step 1. In iTunes, go to Music >> Library and access the songs you like.
Step 2. Tap View and click on the cloud download button to download the song offline first.
Step 3. Once the song is downloaded, highlight it and then click on File >> Create MP3 Version to convert AAC to MP3 in no time.

Can You Convert Protected AAC to MP3 on iPhone or Android?
There is no direct solution to convert protected AAC to MP3 on mobile devices like an iPhone or Android phone. But instead, you are still able to get it done with the assistance of both iTunes Match and a free online AAC to MP3 converter:
This way is only available for iPhone users as Android devices are not equipped with the iTunes Match service.
Step 1. First, subscribe to iTunes Match and then go to the iTunes Store app on your mobile device.
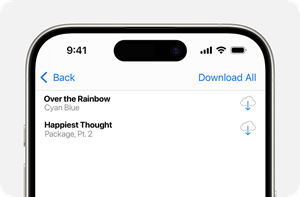
Step 2. Tap Purchased to see all songs that are available for downloading. Subsequently, press the Download button to save them offline.
Step 3. Once the iTunes AAC songs are downloaded, go to FreeConvert in a web browser to convert them to MP3 format in no time.
Conclusion
To sum up, if you already purchased some music from the iTunes Store, you can convert protected AAC to MP3 using iTunes /Apple Music by iTunes Match or burning it to a CD. Luckily, if you want to convert protected AAC to MP3 from Apple Music, MuConvert Apple Music Converter is an amazing downloader that lets you directly download all your favorite songs to MP3 for free offline HD playback. Just don’t miss such a great helper.
Convert Apple Music to MP3 Losslessly
Remove DRM from Apple Music songs and convert them to MP3 without quality loss.
More Posts
8 Best Apple Music Converter Detailed Review [App/Online] Read More » How to Remove DRM from Apple Music [New Updated!] Read More » How to Convert Apple Music to MP3 [2026 Updated] Read More » How to Convert M4P to WAV Lossless in 2025 [4 Ways] Read More »