iTunes, the predecessor to Apple Music, has been out of business for a few years. But for Windows users and some Mac users, iTunes still exists and is useful for content management and media conversion. This is especially important when all of your digital music assets come primarily from the iTunes Store.
Essentially, you can convert all your iTunes music to MP3 format while maintaining the best quality. And this post includes all the detailed steps and information on dealing with your old iTunes music purchases. Besides, you can also learn a quick trick to convert Apple Music content from your iTunes Library.
Part 1: How to Convert iTunes to MP3 Directly
In fact, the audio converter built into iTunes can help you with your needs, but this way only works with unprotected iTunes music. Currently, only songs purchased on the iTunes platform are in AAC format (with the .m4a file extension), without DRM protection.
The majority of songs purchased on iTunes in 2009 or earlier are still DRM-restricted. So to convert iTunes to MP3 directly using the official method, you need to remove the DRM protection on the music before downloading it.
If your songs from iTunes are not protected, you can use this way to convert iTunes music to MP3 or more mainstream formats directly, as well as to choose the audio quality you want them to have. The operations will be separated into Windows and Mac respectively. Check the steps you need here.
Convert iTunes to MP3 on Windows
STEP 1. Launch iTunes on Windows and go to “Edit” > “Preferences“.
STEP 2. In the pop-up window, navigate to the “General” tab and drop down the “Import Settings” menu to select “MP3 Encoder“.
STEP 3. Now, return to your iTunes Library and select iTunes music for converting to MP3.
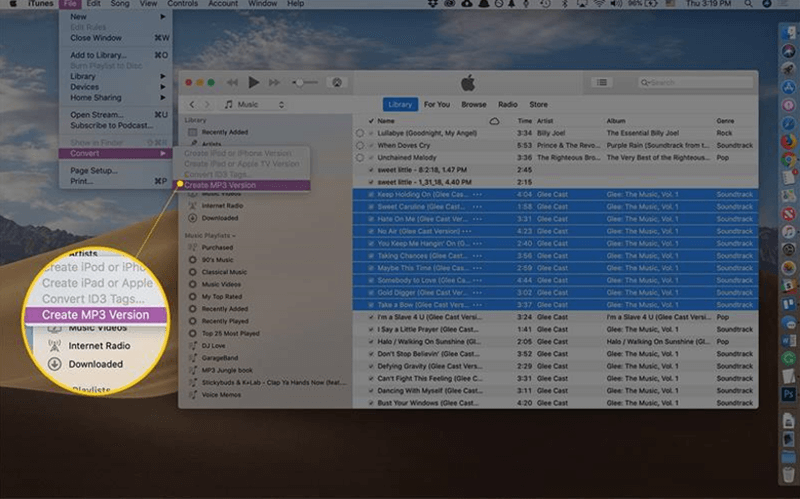
STEP 4. Then, click “File” > “Convert” and choose the “Create MP3 Version” option. After that, an MP3 copy of the iTunes music will be created.

Convert iTunes to MP3 on Mac
STEP 1. Save the iTunes music to “Library” first, then launch iTunes on your Mac device.
STEP 2. Press “Music” > “Preferences” to navigate to the “Files” tab to access “Import Settings“.
STEP 3. Choose “MP3” and submit “OK” to save the change.
STEP 4. Go back to “Library” and select the iTunes music you desire to convert to MP3.
STEP 5. Now, click “File” > “Convert“, then hit “Create MP3 Version” to change iTunes songs to MP3 format.
Part 2: How to Convert Protected iTunes Songs to MP3
As mentioned above, the official way to convert iTunes music to mp3 doesn’t work in all situations. Hence, you probably need a third-party tool to help you better deal with those DRM-restricted songs, and that’s why we recommend TuneFab iTunes Music Converter to you.
With out-performing functionality to remove DRM, TuneFab iTunes Music Converter is able to unlock the protection applied to iTunes music and convert the content from your iTunes Library including songs from Apple Music to MP3 files and other universal formats with easy clicks. Additionally, for your own playlist in iTunes, TuneFab iTunes Music Converter is able to sync with it to load the iTunes Library automatically.
More Amazing Features of TuneFab iTunes Music Converter:
- Various Mainstream Output Formats: TuneFab iTunes Music Converter enables the generally supported audio formats, including MP3, M4A, AAC, AC3, etc, to convert the protected iTunes songs. During the conversion, the DRM encryption will be unlocked, and the downloaded songs are absolutely free to enjoy offline.
- 100% Original Quality and ID3 Info: With advanced tech, TuneFab iTunes Music Converter will preserve the 100% original quality to encode the converted music, along with ID3 tags. You are able to check the song information after getting the converted music offline and enjoy the same quality music playback.
- 10X Faster Speed and Batch Convert Feature: Through the embedded acceleration mode, TuneFab iTunes Music Converter is able to manage the iTunes music conversion to 10X faster. Accompanied by the batch convert feature, a list of iTunes songs is able to be converted within a minute, boosting the efficiency to a higher extent./li>
Here are the steps for you to convert iTunes to MP3 without hassle.
Step 1. Install and Launch TuneFab iTunes Music Converter
After installing TuneFab iTunes Music Converter on your Windows or Mac device, launch the software, and iTunes will be awakened. Through the auto-syncing feature, all songs kept in your iTunes Library will be loaded into TuneFab iTunes Music Converter for selection.
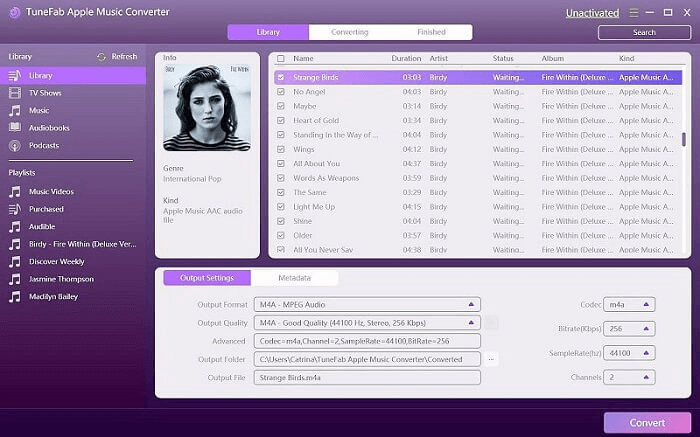
Step 2. Set Output Formats
When you have selected the iTunes music, move down to the “Output Settings” section and choose MP3 as the output format for converting the iTunes music. It is available for you to adjust other parameters such as the audio codec, bitrate, sample rate, and channels for the converted songs.

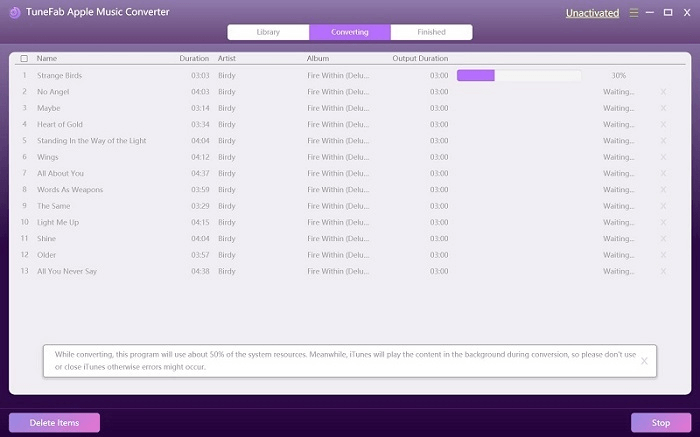
Step 3. Start Converting iTunes Music to MP3
Finally, when everything is ready, just hit the “Convert” icon, and the iTunes music will directly be converted to MP3 for preservation on your device.
Part 3: FAQs About Exporting iTunes Library to MP3
Q1: Why Is the “Create MP3 Version” Greyed Out?
During the conversion process, if you find that the “Create MP3 Version” button is greyed out, then it is likely that the songs are DRM-protected, or the publisher has prohibited some operations on the songs. In this case, you won’t be able to convert music to MP3 using iTunes directly.
A better solution is to download TuneFab iTunes Music Converter to remove DRM restrictions from songs and then download them to MP3. For more details and the user guide, please check “Part 2: How to Convert Protected iTunes Songs to MP3” of this article.
Q2: How to Save the Converted MP3 Files to iPhone?
After converting your favorite songs to MP3 files, you can also save the songs to iPhone in the following 2 ways easily and efficiently.
Method 1: Using iTunes
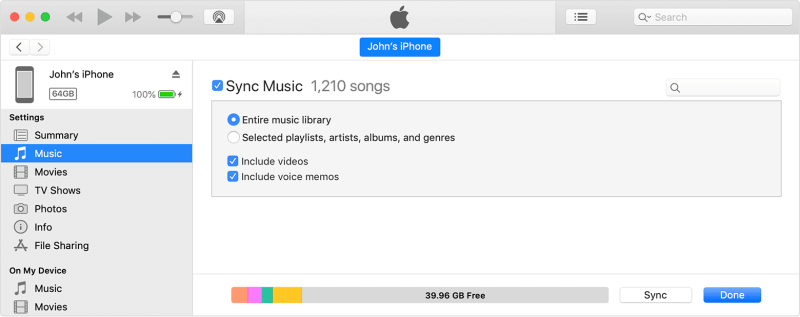
STEP 1: Run iTunes on your Windows or Mac computer and add the converted songs to the iTunes “Library“.
STEP 2: Connect your iPhone to the computer using USB cable, and wait for the “Phone” icon to pop up in iTunes.
STEP 3: Click “Music” and select “Sync Music“. When the sync is finished, click “Apply” to save the songs on your iPhone.
Method 2: Using iCloud Drive
STEP 1: As same as “Method 1” above, you need to run iTunes on your computer, and add your converted music to “Library” first.
STEP 2: Find “Edit” on the menu, click “Preference” and enter the “General” tab, then turn on the “iCloud Music Library” option.

STEP 3: Now go back to “Library“, right-click the song you want to save to your iPhone, and select the “Add to iCloud Music Library” option. After that, as long as the phone is connected to the Internet, the songs saved to iCloud will be automatically downloaded to the iPhone.

Summary
No matter for protected or free iTunes music, you get the 2 ways shown in this article to convert them to MP3 for accessing more flexible offline music playback. But as for the DRM-restricted iTunes songs, TuneFab iTunes Music Converter will absolutely be the best pick. Click the button below, and start enjoying your music without worries!
Convert Apple Music to MP3 Losslessly
Remove DRM from Apple Music songs and convert them to MP3 without quality loss.
More Posts
8 Best Apple Music Converter Detailed Review [App/Online] Read More » How to Remove DRM from Apple Music [New Updated!] Read More » How to Convert Apple Music to MP3 [2026 Updated] Read More » How to Convert M4P to WAV Lossless in 2025 [4 Ways] Read More »