Are you considering switching from an iPhone to an Android phone but worried about losing access to your cherished Apple Music library? After all, enjoying the downloaded files (M4A for iTunes, M4P for Apple Music) on Android devices is not so straightford and you need more time to find a solution for compatibility.
The good news is that you can go on with the transfer with ease. You can either play M4P on your Android device or convert downloaded M4A files to more commonly accepted audio files easily. Whether you prefer manual transfers or the convenience of third-party apps, in this comprehensive guide, we’ll introduce four easy-to-practice methods step by step, ensuring you don’t miss a beat when transferring Apple music to Android. Say goodbye to uncertainty and hello to enjoying your favorite tunes on your new Android device. Let’s dive in right now.
1. Transfer Music from iTunes to Android Manually
As known, with iTunes, you can enjoy and sync your favorite music on PC. It is a pity that iTunes does not apply to Android devices. Naturally, a burning question arises, “how to transfer Apple music from iTunes to Android manually?” Take it easy. With a workable USB cable, you can manually transfer music from iTunes to Android.
Before transferring, please have your favorite music on iTunes downloaded to the computer. Here’s how to transfer Apple Music from iTunes to Android.
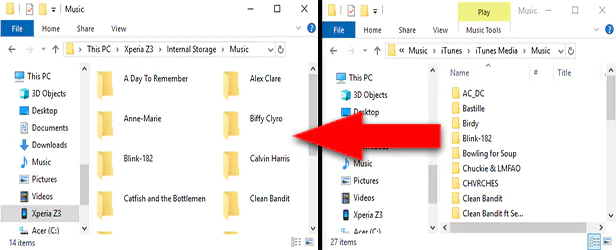
Step 1. Connect your Android device to the computer with a USB cable. For some devices, you may be asked to choose which mode you want the Android device to use, please select MTP (Transfer Files).
Step 2. Go to “My Computer” and locate the iTunes folder, choose and copy the tracks you want to transfer. Generally, you can locate the iTunes music files by going to: Your username (or This PC) > Music > iTunes > iTunes Media > Music.
Step 3. Navigate to your Android device’s music folder and paste what you have copied to the folder. Depending on your preference, instead of copying & pasting, you can also drag and drop tracks from iTunes to your Android.
After the transfer finishes, you can open your music player app on the Android device. A reminder, you need a compatible player like VLC on the device as the downloaded files from iTunes are in M4A format. For those who prefer not to install one more music player on devices, you can convert iTunes to MP3 first.
2. Sync iTunes Music to Android via Apple Music
Though there is no iTunes for Android, it does not mean there are no solutions for those who want to access iTunes songs on Android without using a USB cable. After syncing music on your iTunes to iCloud, you can also enjoy it on an Android device with the Apple Music app installed.
As iCloud is involved in this method, you must be a current Apple Music subscriber and log into the same Apple ID on the computer and the Apple Music app. Below are steps to sync iTunes to Android by using the Apple Music app.
Step 1. Open iTunes on your computer, click “Edit” on the top left, and locate “Preference“.
Step 2. Go to the “General” tab, turn on the “iCloud Music Library” option, and tap “OK” to confirm.
Step 3. Sync music to your iCloud storage by tapping “File” on the top left (on the left of “Edit”), then select “Library” and “Update iCloud Music Library” in order.
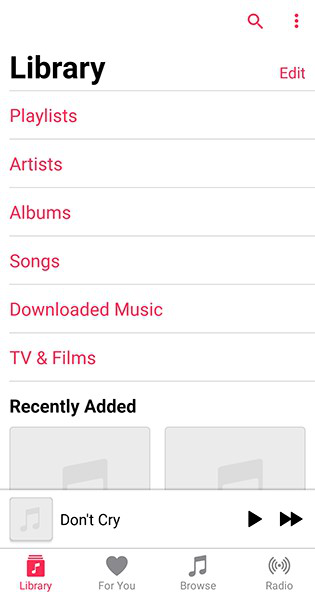
Step 4. After it finishes syncing, launch the Apple Music app on your Android phone and click the “Library” tab. Then you will find synced music.
3. Transfer iTunes Library to Android with Fast Data Transfer
Dealing with official apps is reassuring. However, it can be time-consuming, especially when transferring multiple pieces of Apple music from iPhone to Android at the same time. In this case, turning to third-party apps is highly suggested. Being designed with particular features, they usually do better in ease of use and high efficiency. On how to transfer music from Apple to Android, we’d like to recommend a trustworthy third-party data transfer: FonePaw DoTrans.
FonePaw DoTrans is an excellent data transfer to break the barrier among various devices with different operating systems. It is fully compatible with Windows PCs, Apple-developed devices, and Android phones such as the Samsung Galaxy S Series, and more. Whether you want to import files from a computer to a mobile device (either an iPhone or Android phone), export files to a computer for backup, or for the convenience of phone-to-phone transfer, you can expect to get the files (and even a whole folder) on a new device in seconds.
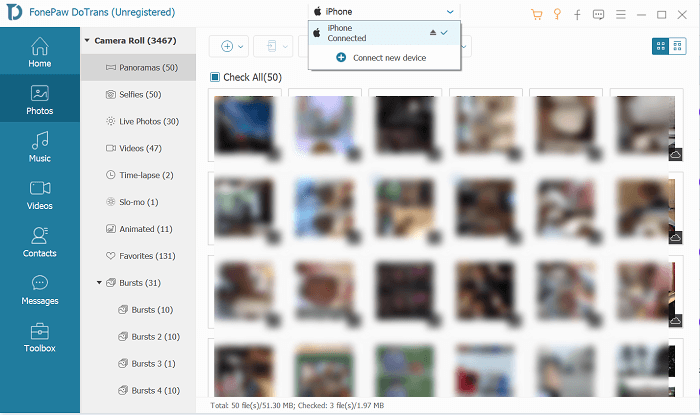
Step 1. Install and launch the DoTrans, connect your iPhone and Android phone to the computer with two USB cables, and wait for a few seconds till they are recognized by the software.
Step 2. On the top middle of the home page, drop down the device menu to select “iPhone” as the source device, then find the files you want to transfer by going to the left panel and selecting a file type.
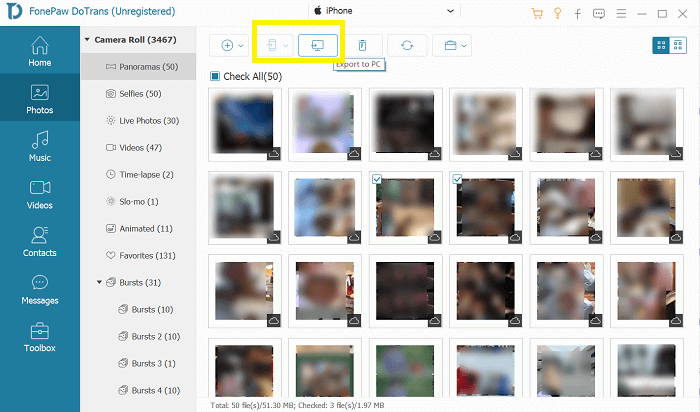
Step 3. Move up to the top middle, click “Export to Device” and select the other connected Android device as the target one for exporting to. Now, all is done and you just need to wait for the process to finish.
4. Copy Converted iTunes Tracks to Android with Music Converter
We finally roll to the final method. If you read carefully rather than scanning the three methods mentioned above, you will notice that you will download M4A files from iTunes, which means one more step is required before enjoying the tracks on your Android devices. That is, to install a compatible player like VCL. It sounds a bit time-consuming. Can you go beyond the restriction? Yes, before transferring the iTunes library to Android, you can convert your downloads to more commonly accepted formats with MuConvert Apple Music Converter in advance.
MuConvert Apple Music Converter stands out as a professional solution for converting downloaded M4A/M4P files from iTunes/Apple Music to MP3/M4A/WAV/FLAC formats without compromising sound quality. Equipped with hardware acceleration, MuConvert offers lightning-fast conversion speeds up to 20 times faster, enabling users to batch convert music quickly and effortlessly. Just enjoy a seamless music streaming experience offline when transferring the Apple music library to Android.
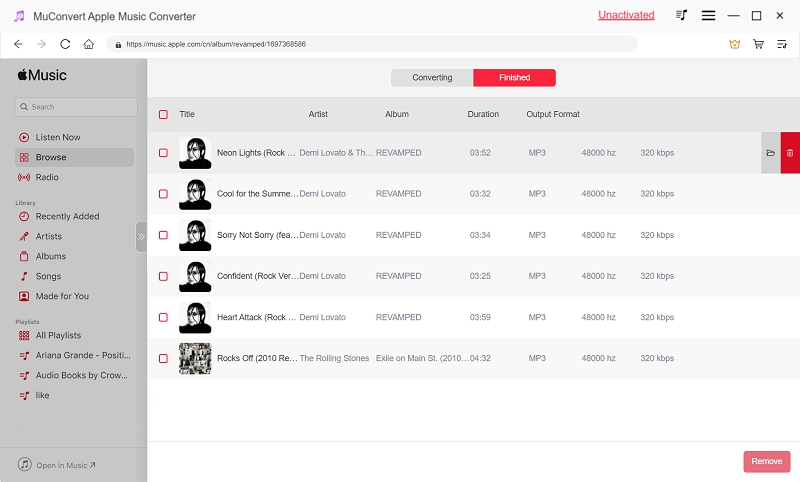
The converting process MuConvert Apple Music Converter is pretty easy. After having the app installed on your computer, please sign in to the Apple Music Web Player via the app, and then find & select the Apple Music song, album, or playlist you want to transfer, click “Add to the conversion list” and set the wanted output format (MP3 is highly recommended). You can refer to our blog post for a step-by-step guide on how to convert Apple Music to MP3. Once you get MP3 files, you can transfer them to your Android device either with a USB cable and enjoy them on any music player!
Conclusion
Whether you prefer to transfer music from iTunes m annually, via Apple Music, or with a fast data transfer tool, you can only listen to them within the music app on authorized devices or turn to an M4A-compatible music player. That’s the reason why we highly recommend you copy converted iTunes tacks to Android with MuConvert Apple Music Converter. By converting the downloaded M4A or M4P files to commonly accepted MP3/M4A/WAV/FLAC audio files, you will gain more control over the music you purchased from iTunes and Apple Music. Try now to experience uninterrupted music enjoyment on your new Android device!
Convert Apple Music to MP3 Losslessly
Remove DRM from Apple Music songs and convert them to MP3 without quality loss.
More Posts
8 Best Apple Music Converter Detailed Review [App/Online] Read More » How to Remove DRM from Apple Music [New Updated!] Read More » How to Convert Apple Music to MP3 [2026 Updated] Read More » How to Convert M4P to WAV Lossless in 2025 [4 Ways] Read More »