Today, many content creators prefer to edit quality videos with Premiere Pro and add different tracks for BGM to get a high click-through rate on YouTube and TikTok. Apple Music with a vast library of songs is always the first choice among people. However, due to DRM restrictions on Apple Music, these songs can not be directly downloaded and transferred. So how to add Apple Music to Premiere Pro and use it? This post guides bypassing these limitations and adding Apple Music to your Premiere Pro effortlessly.
Part 1. Download Apple Music Before Adding to Premiere Pro
To fully harness the potential of Adobe Premiere Pro, especially in the context of adding Apple Music tracks to your projects, it’s crucial to remove the limitations imposed by DRM protection. The first step to get rid of this hassle is converting Apple Music songs into a common audio format before adding music from Apple Music to Premiere Pro. But how to do that?
MuConvert Apple Music Converter is the software you need to get things done. This converter is a powerful tool to remove DRM protections and convert Apple Music tracks to MP3 or other regular formats. This not only allows for their use in video editing projects but also ensures that you can keep and play these tracks on various devices, long after your Apple Music subscription may have ended.
- Versatile Format Options: You can convert Apple Music to MP3, M4A, WAV, and FLAC common files, ensuring that converted Apple Music tracks can be easily used across different devices and platforms, including video editing software like Adobe Premiere Pro.
- Original Sound Quality: When converting Apple Music tracks, the converter maintains the original sound quality, which ensures that the music adds the desired impact and emotion to your video projects, without any compromise in audio fidelity.
- Fast-speed Batch Conversion: The tool can convert multiple songs at once, with speeds up to 10X faster than traditional converters, making it a time-efficient solution for handling large music libraries.
- ID3 Tags Preservation: The converter retains all metadata info such as the title, artist, album, and genre, which is essential for organizing and managing your music library efficiently, making it easy to locate suitable songs for BGM when editing videos.
Now let’s see how to download songs from Apple Music by MuConvert step by step.
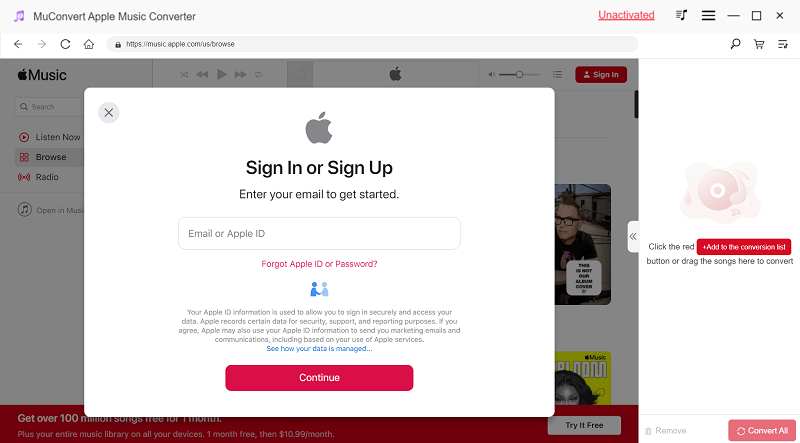
Step 1. Install MuConvert Apple Music Converter on your Windows or Mac computers. Then launch the program to access its built-in Apple Music Web Player. Here, you can log in to your Apple account.
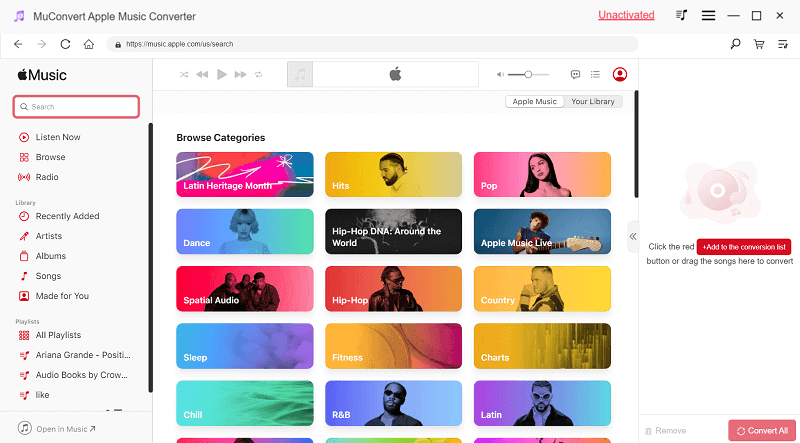
Step 2. Search and select your desired tracks and click on Add to the conversion list, and the software will prepare them for conversion.
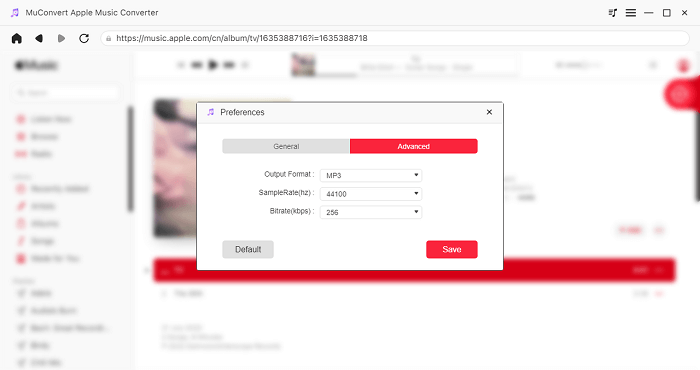
Step 3. Once your Apple Music tracks are in the conversion list, you can adjust the list to the right. In this section, choose the preferred output format and modify the Bitrate and SampleRate according to your requirements.
Step 4. After finalizing your selections and settings, click on the Convert All button to initiate the conversion. You can check the numbers to the right of the song to confirm the conversion progress, and have the option to pause the process anytime by clicking Stop All.
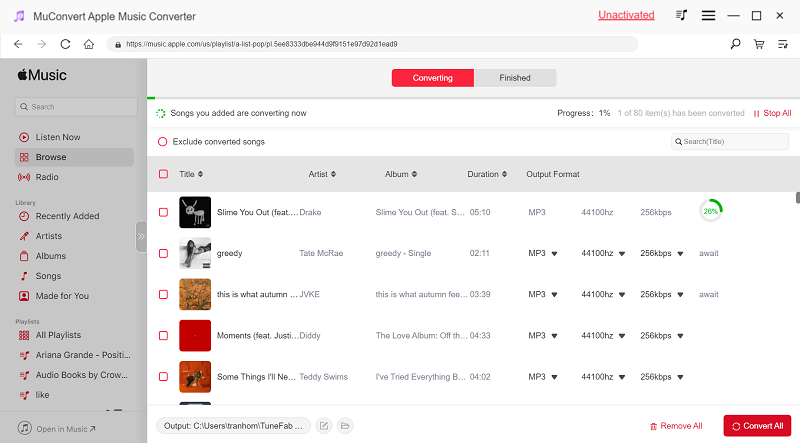
Upon completion of the conversion, the entire list of converted tracks can be viewed in the Finished section of the program, and you can simply check them in the target output location.
Part 2. Add Apple Music to Premiere Pro and Make Use of It
Once the download is complete, you can effortlessly upload these local audio files to Adobe Premiere Pro for use in your projects. You are also allowed to edit and tailor the tracks to perfectly fit the mood and style of your videos.
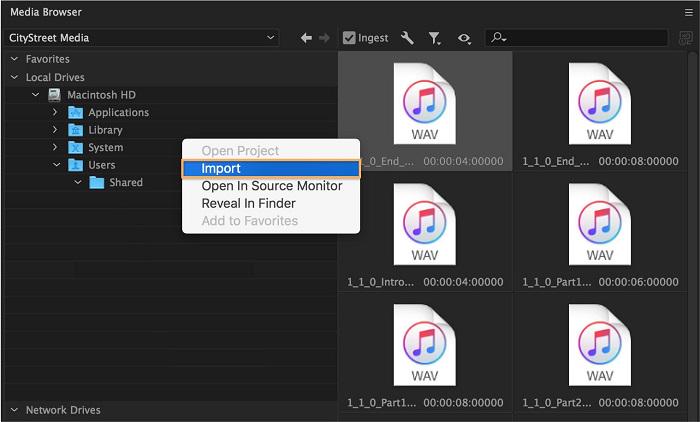
Import Apple Music to Premiere Pro
Launch Adobe Premiere Pro on your computer. Navigate to the File menu and choose the Import feature to locate and select your converted Apple Music files, then click Open. As an alternative, you have the option to directly drag and drop the music files into your project panel. After this, the Apple Music tracks are ready to be used as BGM in your Premiere Pro projects.
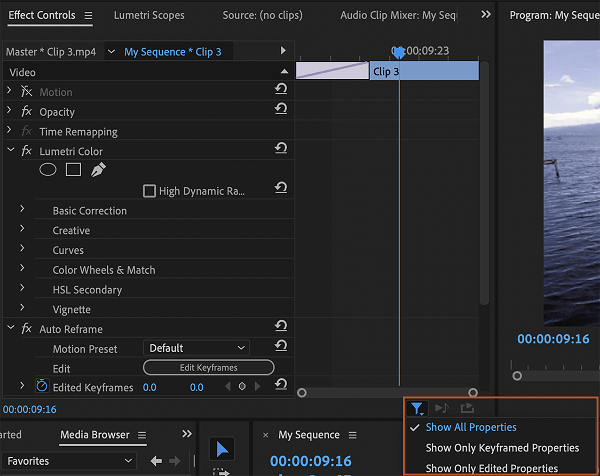
Use Apple Music as BGM on Premiere Pro
Once you have successfully added Apple Music tracks to your Premiere Pro project, you can begin refining them to enrich your video’s overall impact. Here’s a brief guide on how to utilize and adjust the uploaded music as an effective background score, such as editing the audio track and balancing sound effects.
Navigate to Window > Project and double-click the file in the Source panel. Then, drag it into your sequence in the Timeline panel. Adjust the track’s volume using the Audio Gain option in the Effect Controls panel. Add audio fades for smooth transitions and utilize Auto Ducking in the Essential Sound panel to lower the music volume when there’s dialogue or voiceover. By tagging voiceovers or sound effects properly, the music dynamically adjusts, maintaining a balance between all audio elements in your project.
FAQs About Adding Music from Apple Music to Premiere Pro
Q1: Can I Add Music from iTunes Music to Premiere Pro?
Yes. If you have purchased songs on iTunes, you can directly download them and import them into Premiere Pro for use. If you haven’t purchased its plan, you can also use Apple Music to sync your iTunes library, and then use workable tools like MuConvert Apple Music Converter to download the songs from iTunes to your computer. This allows you to effectively incorporate your favorite iTunes tracks into your video projects in Premiere Pro.
Q2: How to Add Apple Music to Premiere Rush on Mobile?
Yes. But first, you need to download Apple Music songs to your iPhone. For this, you can convert songs into an unprotected format and transfer them to your phone. Launch Premiere Rush, and then simply import these files by selecting Your Media and then choosing the Audio files from your phone’s storage. This allows you to use Apple Music tracks in your video projects on Premiere Rush.
Conclusion
To sum up, if you want to add Apple Music songs to Premiere Pro, you need to convert them into MP3 or other unprotected formats first. MuConvert Apple Music Converter effectively removes DRM encryption from Apple Music songs, allowing you to convert them to MP3 format at an impressive speed. Now install it and download tracks from Apple Music to enhance your videos to be posted on YouTube or TikTop.
Convert Apple Music to MP3 Losslessly
Remove DRM from Apple Music songs and convert them to MP3 without quality loss.
More Posts
8 Best Apple Music Converter Detailed Review [App/Online] Read More » How to Remove DRM from Apple Music [New Updated!] Read More » How to Convert Apple Music to MP3 [2026 Updated] Read More » How to Convert M4P to WAV Lossless in 2025 [4 Ways] Read More »