Music has become an inseparable part of our daily lives. Numerous streaming platforms have made listening to music easier than ever. However, do you truly know how to get the best streaming quality? For example, how much do you know about audio bitrate, the key parameter that significantly impacts the overall quality of streamed music?
In this blog, we’ll explore what audio bitrate is, how it affects music quality, and how it’s different from audio codec. After reading, you’ll fully understand bitrate for common audio formats and can self-check this crucial parameter. Plus, we’ll provide a simple way to help enjoy your favorite streaming music offline at the ideal bitrate. Keep reading to unlock the secrets of exceptional streaming music listening!
What is Audio Bitrate?
Audio bitrate refers to the amount of data used to store audio information in a given period. It is usually measured in kbps (kilobits per second). Generally, the bitrate under 128kbps is regarded as low, 160kbps to 192kbps as medium, and over 256kbps as high. It plays a significant role in determining the sound quality of music, podcasts, or any audio file you listen to.
How Audio Bitrate Impacts Audio Quality
Audio bitrate directly impacts audio quality by determining the amount of data used to represent sound. Higher bitrate provides more data with better details to represent richer, clearer sound quality. Low bitrate, on the other hand, compresses audio more, leading to loss of clarity, muffling of details, and distorted sounds.
The differences between lower and higher audio bitrates become more significant when it comes to complex audio like music with different vocals or many instruments. For example, audio at 128kbps might sound flat, while audio at 320kbps offers a more natural, lifelike listening experience.
Audio Bitrate vs. Audio Codec
Audio bitrate and audio codec are two different aspects of digital audio. When dealing with a different audio codec, the audio quality may change, even at the same bitrate. They work together to influence overall sound quality and file size. Below are the detailed differences for your information.
- Audio Bitrate: As mentioned, audio bitrate refers to the amount of data used to encode audio per second. It is often expressed in kilobits per second (kbps) or megabits per second (Mbps). It affects the detail and clarity of the sound. A higher bitrate means better sound quality and a larger audio file. A lower bitrate means low-quality sound but also a smaller file.
- Audio Codec: It is the algorithm or software that is used to compress audio files. The codec determines the compression efficiency and the audio file format. There are many codecs. Some output lossless audio files while some offer lossy ones. Lossless codecs like FLAC, WMA, and ALAC preserve all audio information, while lossy codecs such as MP3 and AAC remove some unimportant details to reduce file size.
Bitrate in Different Formats
Even though the actual bitrate may change slightly depending on the specific encoding settings, they fall into specific value ranges for a particular audio file format. You can check the details of some common formats below.
- MP3 (MPEG-1 Audio Layer III): It is the most popular audio format making a balance of file size and sound quality. Typically, its bitrate ranges from 96 to 320kbps. When it reaches 192kbps or higher, it delivers high-quality sound. It is widely applied for the greatest compatibility.
- FLAC (Free Lossless Audio Codec): This is a lossless format that preserves original sound quality. The bitrate for the format starts from 700kbps and can be up to 1,400kbps. It is a preferred choice for lossless audio enthusiasts.
- WAV (Windows Media Audio): As the name indicated, it refers to uncompressed audio files created by Microsoft. Usually, it maintains CD-quality sound at 1,411kbps. Therefore, when playing high-definition audio with Windows Media Player, it comes as the top choice for many.
- M4A (MPEG-4 Audio): It is often used in Apple devices for songs, audiobooks, and podcasts. It can be encoded with either AAC (Advanced Audio Coding) for lossy compression or ALAC (Apple Lossless Audio Codec) for lossless compression, with bitrate ranging from 128kbps to 256kbps.
Tip: How to Check Music Quality by Yourself
Since bitrate is so important, it’s no wonder that even some of the best streaming services (/resources/best-music-streaming-service/) correlate the parameter to audio quality. In this section, we’ll guide you through verifying the bitrate for local audio files and even changing or enhancing it on several popular streaming platforms.
Check Bitrate on Spotify
Depending on your device, plan, and internet connection, you enjoy different audio quality at bitrates from 24kbit/s to 320kbit/s on Spotify. As you’re not allowed to adjust audio quality when streaming music on its web player, below we round up instructions to check Spotify bitrate on its application.
- Low Quality: 24kbit/s AAC
- Normal Quality: 96kbit/s AAC
- High Quality: 160kbit/s AAC
- Free users enjoy up to 160kbit/s audio quality while it can be up to 320kbit/s for premium subscribers.
● On Desktop
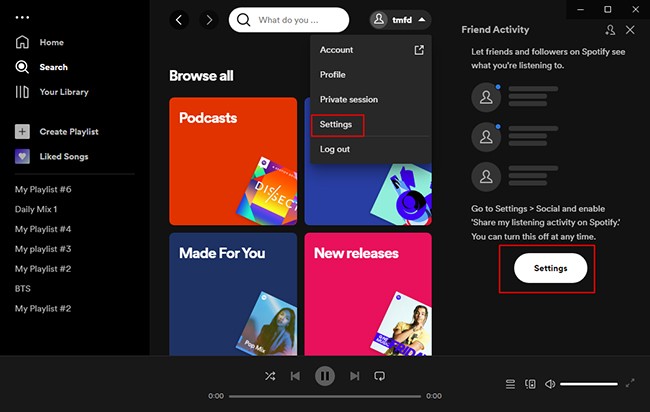
Step 1. Open Spotify and click on the gear icon in the top-right corner.
Step 2. Select “Settings” from the dropdown menu and scroll down to the “Audio Quality” section.
● On Mobile Device (Android & iOS)
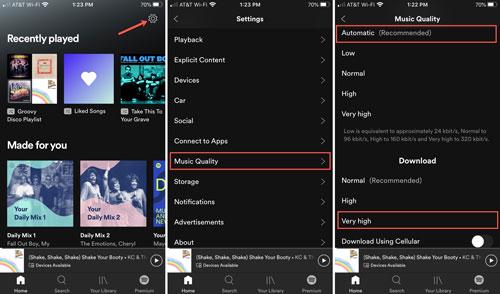
Step 1. Open “Spotify” on your mobile device, tap “Your Library”, and go to “Settings”.
Step 2. Go to “Music Quality”, and you can know the audio quality you’re applying, where you can also change your preference.
Verify Bitrate on YouTube Music
YouTube Music offers a wide array of music with compelling music movies. As Spotify, it restricts bitrate checking (and changing) to its mobile app and for premium users only. The following steps are for your reference. They apply to both Android and iOS devices.
Below you can find the exact bitrate for corresponding sound quality when streaming/downloading YouTube Music.
- Low Quality: 48kbps AAC & OPUS
- Normal Quality: 128kbps AAC & OPUS
- High Quality: 256kbps AAC & OPUS
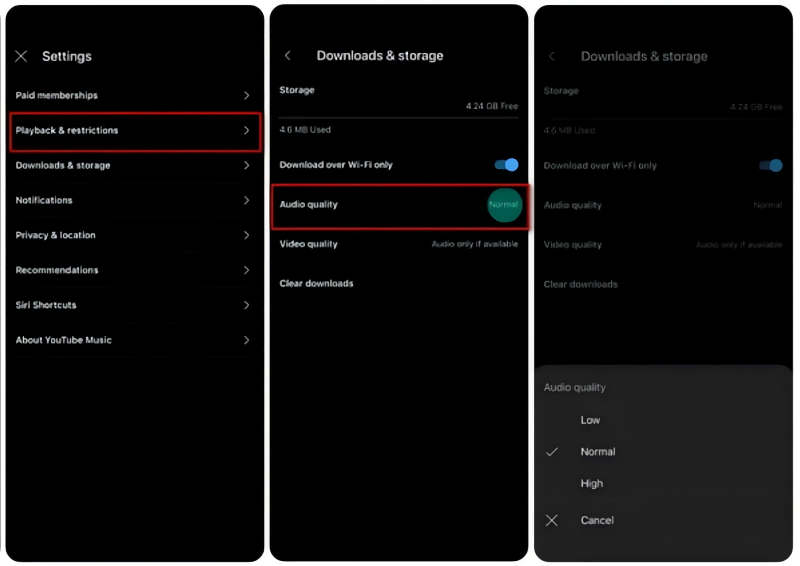
Step 1. Tap on your profile picture in the YouTube Music app to select “Settings”.
Step 2. Click “Playback & restrictions”, go to “Audio quality”, and you can find the audio quality you’re using now. You can also tick a new choice from “Low”, “Normal”, “High” or “Always High”.
Get the Highest Bitrate on Apple Music
Without settings in advance, Apple Music will auto-play tracks at 256kbps for the standard quality. With settings, you can enjoy CD quality at 16-bit/44.1 kHz and up to 24-bit/192 kHz for Hi-Res lossless. Below are instructions for you to get the greatest audio quality on your mobile devices.
● On iPhone/iPad
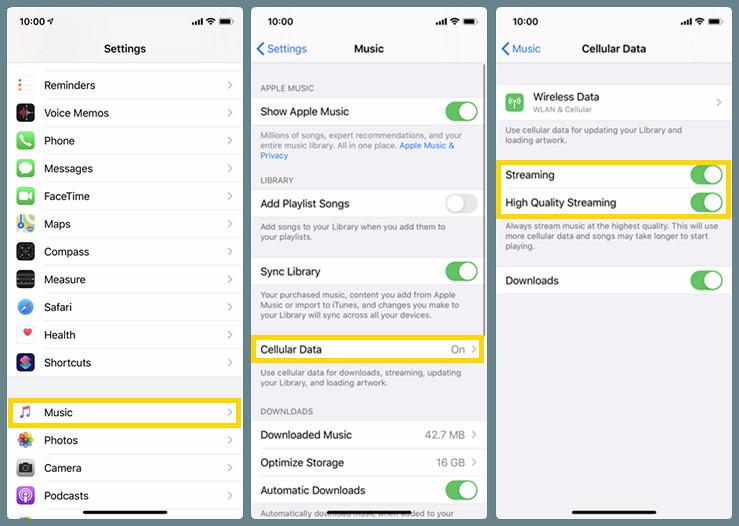
Step 1. Open “Settings” on your device, and scroll down to find “Music”.
Step 2. Tap on “Cellular Data” and allow Apple Music to use both “WLAN & Cellular Data”.
Step 3. Toggle on the “High-Quality Streaming” option, then you can always stream music at the highest quality.
● On Android
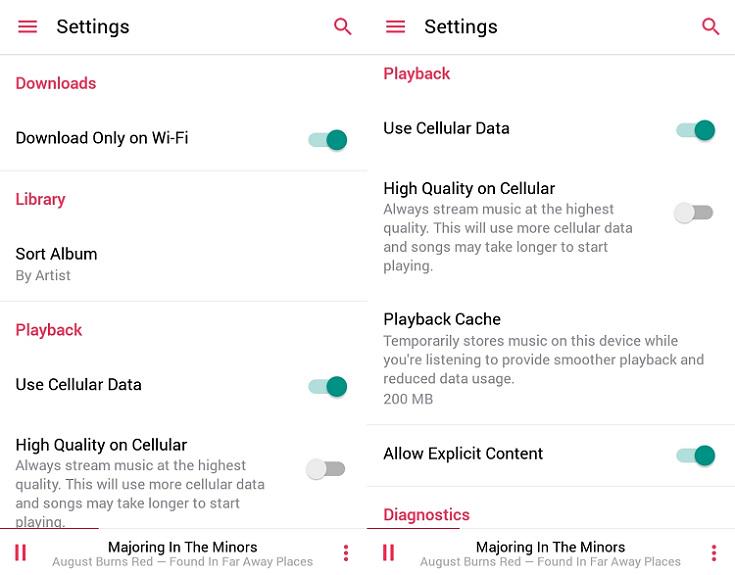
Step 1. Open Apple Music, select “Menu”, and go to “Settings”.
Step 2. Go to “Playback” and enable “Use Cellular Data” and “High Quality on Cellular”.
Confirm Bitrate for Downloaded Audio Files
If you already have downloaded the music to your computer (/resources/download-music-to-computer/) as plain audio files, below are steps you can follow to check its bitrate.
● On Windows
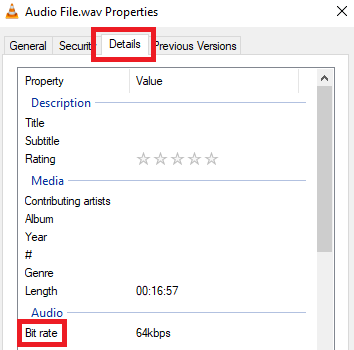
Step 1. Find the audio file and right-click the file to select “Properties”.
Step 2. In a new window that pops up, click “Details”, scroll down to find “Audio”, and then you can find “Bit rate”.
● On Mac
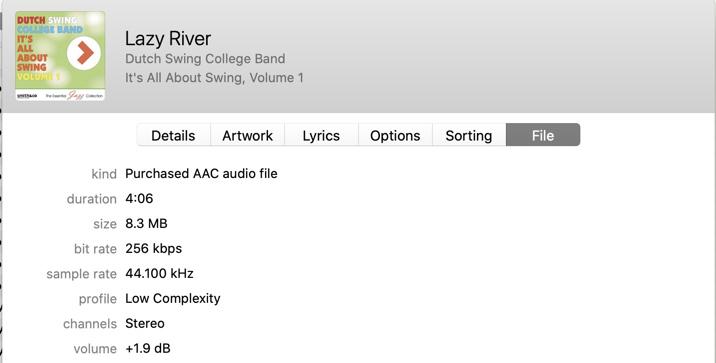
Step 1. Go to “Finder” to find the audio file and right-click it.
Step 2. When “Get Info” appears, look for the “More Info” section. Here, you will find details about the audio file including bitrate. Please note they will often be listed as “Bit rate” or “Data rate.”
Enjoy Streaming Music with Perfect Bitrate with the Best Music Converter
Now that we’ve explored almost everything about bitrate, you may wonder if there is the perfect bitrate for streaming music, especially for offline listening. After all, you are so tired of switching to various platforms. The download limits imposed by these platforms such as device compatibility, DRM encryption, in-app playback, etc. are also frustrating. How fantastic it would be if there was a method to download all your favorite streaming tunes with its best bitrate for offline playback!
Certainly, there is. It is where the MuConvert All-in-One Music Converter comes in. As a one-stop music downloader, it is up to the task. The powerful web player allows you to download streaming music from Amazon HD/Ultra HD and other platforms including Spotify, Apple Music, YouTube Music, and more. Moreover, it retains the original sound quality. You can enjoy your favorite tracks at optimal bitrate without compromise.
- Save music from multiple streaming services to MP3, WAV, M4A, and FLAC
- Convert your favorite streaming music to DRM-free audio for unlimited playback
- Retain the original sound quality at the best bitrate for immersive listening
- Download music in bulk with up to 35X faster speed
- Embed a powerful web player for easy streaming, searching, and downloading
How to Download Music to Computer with MuConvert
Now let’s see how easily you can download the best quality streaming music to your computer with the help of MuConvert All-in-One Music Converter.
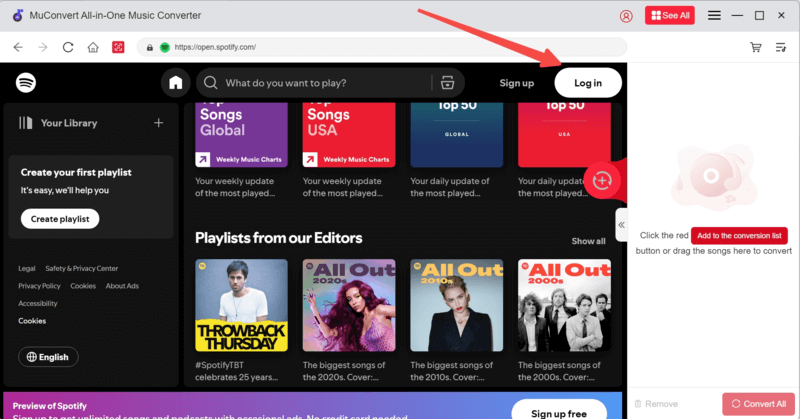
Step 1. Get MuConvert Ready
Download, install, and run MuConvert on your computer (Windows/MacOS). Select the streaming platform and log in with your account. Here we take Spotify as an example, and you can choose from all listed platforms.
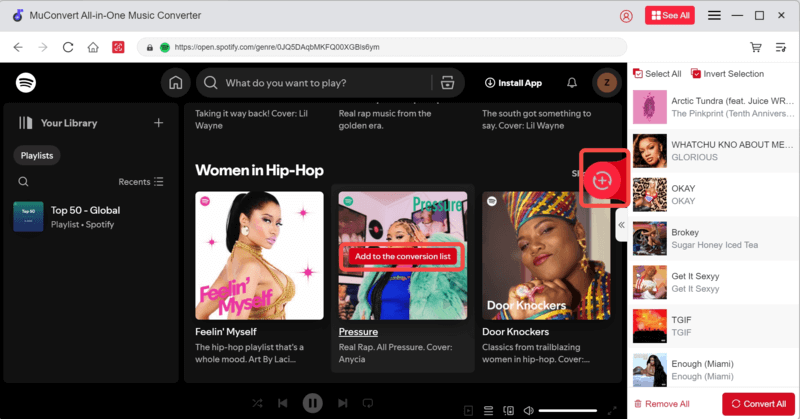
Step 2. Add Music to Download
Browse the library, select the track you want to download, and click the floating “+” icon. Then, the track will be added to the download list for parsing. You can also directly drag & drop the title to the “+” button.
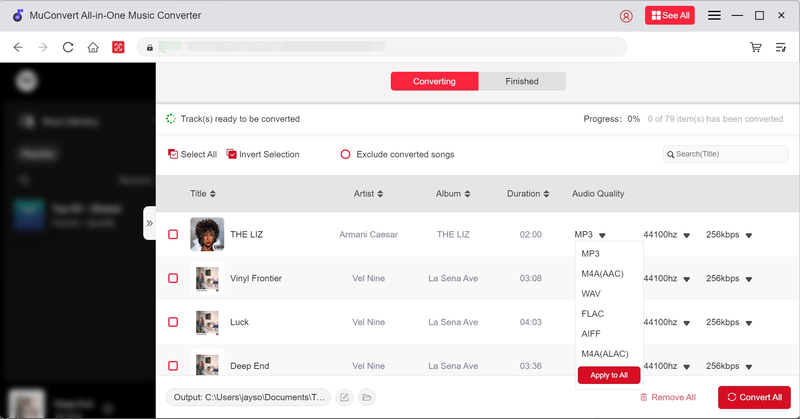
Step 3. Set Output Parameters
After parsing, you can select the audio format, bitrate, and sample rates for each title. Here you can also click “Apply to All” to make your separate settings take effect for all selected tracks.
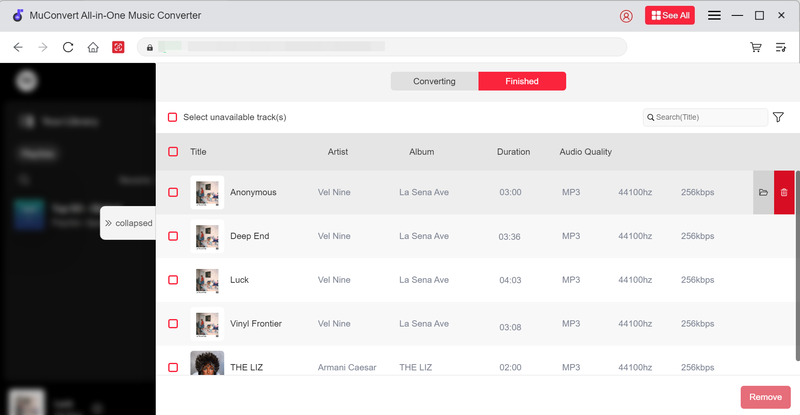
Step 4. Download and Check Streaming Music
Click “Convert All”, and MuCovert will start downloading all added tracks. Once complete, you can find all downloads under “Finished”. By clicking the folder icon next to each title, you’ll find the audio file on your computer. They are DRM-free. You can transfer or listen to them on any device.
Bottom Line
In this blog, we’ll break down everything you need to know about audio bitrate, from its definition and impact on audio quality to how it compares with audio codecs. After reading, you must have known why most streaming platforms correlate bitrate with the audio quality they can provide.
If you want to enjoy streaming music at the perfect bit rate offline, don’t hesitate to try MuConvert All-in-One Music Converter. This all-in-one downloader enables you to download high-quality music from multiple streaming platforms hassle-free. With a few clicks, you can enjoy the best sound quality. Download it now to embrace the perfect listening experience!
Convert Music from Multiple Platforms to MP3 in One Click
Download Spotify/Apple Music/Amazon Music/YouTube Music/Pandora/Deezer/Audible to MP3 in one music converter for permanently offline playback.
More Posts
How to Convert Music Files to MP3 on Any Device Read More » 8 Best Music Downloaders or MP3 Download Sites for Computer Read More » How to Download MP3 Songs for Seamless Playback on Any Device Read More » 15 Best Spotify Downloaders in 2025 [Free/Online/App] Read More » 5 Ways to Download Spotify Songs to MP3 [New Updated] Read More »