Have you ever noticed a mismatch between your Apple Music library and the songs on your iPhone, despite them initially being in sync? Or, perhaps, when setting up a new iPhone, you logged in only to find your Apple Music library completely empty?
These issues often stem from synchronization not being properly enabled. In this blog, we’ll address these common scenarios such as missing songs, or other synchronization-related issues. We also provide 4 effective methods to sync your Apple Music to your iPhone. Let’s dive straight into the solutions!
What Preparation You Should Make Before Syncing?
To synchronize your music effectively, it’s crucial to first specify the songs you intend to sync. If you’ve acquired songs from other music platforms, it’s advisable to create a backup before proceeding. This precautionary step is essential because, during the synchronization process, Apple Music has the potential to overwrite or erase the ID3 information associated with the songs. In cases where Apple Music cannot locate matching music sources, it may opt to skip those particular tracks. This, in turn, can lead to the absence of certain songs in your library once the synchronization process is completed.
Yes, there are multiple methods to get the syncing done, but before you get started, there are a few things you need to prepare:
- Subscribe to Apple Music. If your subscription has expired or been canceled, there is no way to sync new songs to your iPhone.
- Make sure you have logged in to the same Apple ID account as Apple Music on your iPhone, because only by doing this can you access and synchronize your Apple Music library.
- Use a stable and secure network connection to ensure the speed and stability of syncing.
Part1. How to Use Sync Library to Sync Apple Music to iPhone
When everything is ready, you can sync the songs, albums, and playlists added to the music library in Apple Music to iPhone by using Sync Library. Next, we will explain the specific operation procedures in detail through the Apple and Windows systems respectively.
Use Sync Library on Apple Devices
When using Apple Music, you can turn on the Sync Library function. This will automatically sync the music in your iCloud Music Library with the music library on your Apple device, which means that if you log in to the same Apple ID account on any Apple device, such as an iPad, iPhone, or Mac computer, you can access the synced music without having to manually sync it to each device. The music library on each device will be updated automatically.
Now, let’s take the operation on an iPhone as an example, and see how it is done:
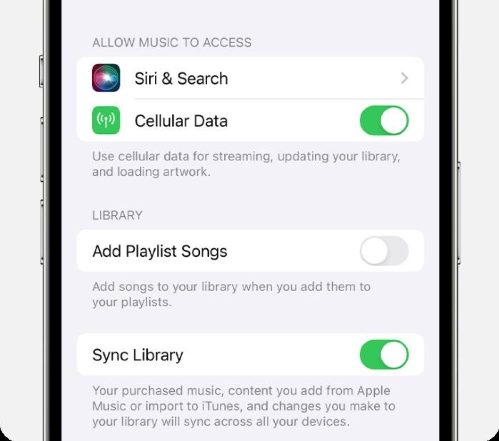
Step 1. Go to “Settings” on your iPad.
Step 2. Scroll down to “Music”, and click on it.
Step 3. Locate “Sync Library”, turn it on, and you are all set.
Songs from iCloud Music Library will replace the original music after enabling the Sync Library on an Apple device. If this happens, there is no way to sync music with the device using iTunes, resulting in the only way to add songs to it is by downloading them from iCloud.
Use Sync Library on Windows
On Windows, Sync Library is called iCloud Music Library. By opening iTunes on your Windows computer and logging in with the same Apple ID as your Apple Music, you can synchronize after checking the “iCloud Music Library” box. The detailed steps are as follows:
Step 1. Open iTunes on your Windows computer and sign in.
Step 2. Tab “Edit”, and choose “Preferences”.
Step 3. Select “General”, locate ” iCloud Music Library”, click on it, and hit “Ok” at the bottom to save your changes.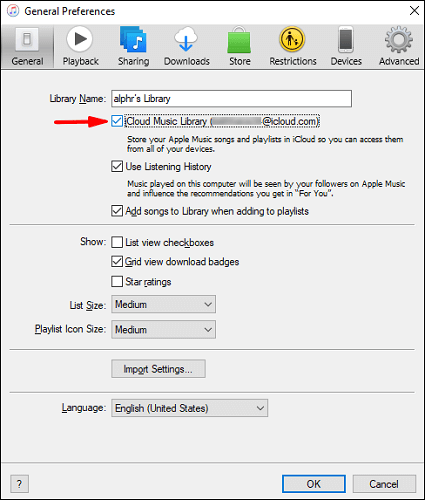
Part2. How to Sync Playlist to iPhone Using Finder on Mac
If you’re a Mac OS user, a convenient option for syncing is leveraging a file manager, and the default choice here is Apple’s own Finder. With Finder, you have familiar tools for copying, pasting, and deleting files and folders, including your music files on your Mac. Unlike the earlier method, using Finder entails manual synchronization, necessitating a USB cable or a Wi-Fi connection.
Now let’s take a closer look at the whole process:
Step 1. Connect your iPhone and Mac computer through USB or USB-C cables, or connect them via the same wifi.
Step 2. Open Finder on Mac (the blue icon with a smiling face).
Step 3. Find “Locations” on the left menu bar and select your iPhone.
Step 4. Locate and click “Music” to enter the details page.
Step 5. Select “Sync Music onto (name of the device)” in “Options”, and then check what you want to sync below.
Step 6. Click “Apply”, wait a moment, and you are done.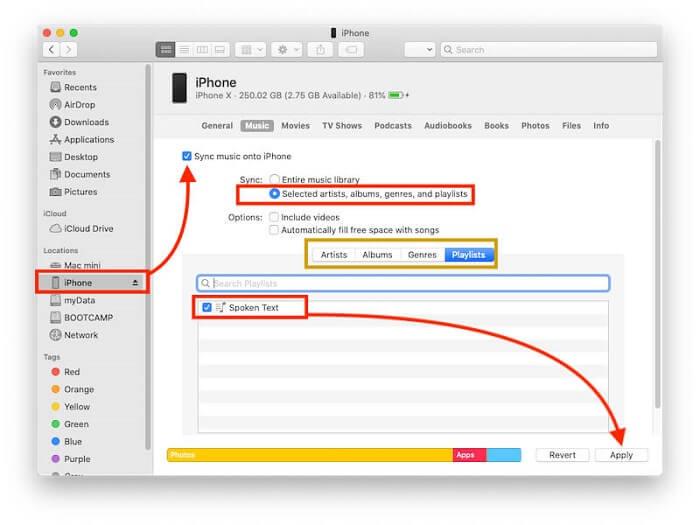
Part3. How to Use iTunes to Sync Apple Music to iPhone
In addition to Sync Library and Finder, iTunes stands as an alternative for synchronizing your extensive Apple Music library. Particularly suitable for Windows users or those on older macOS versions, iTunes provides control options such as Automatic sync and manual sync, catering to users who prefer a more hands-on approach to managing their music collections
Automatic Sync
Enabling automatic synchronization is the most efficient way to synchronize your iPhone with iTunes. Once turned on, iTunes will directly synchronize the corresponding content such as music, playlists, and videos to your iPhone when it is connected to your Mac. You can add, delete, or update music and the changes will be automatically synced to your device when it is connected to your iPhone.
Now, let’s see how to use the feature:
Step 1. Connect your PC and iPhone using a USB cable or ensure that they are connected to the same Wi-Fi network.
Step 2. Open iTunes on your PC.
Step 3. Click on the device button (an iPhone icon) located on the upper left corner of the iTunes home page.
Step 4. In the content type column on the left, select “Music”.
Step 5. Enter the details and select the specific items you want to synchronize.
Step 6. Finally, click on the “Apply” button to complete the process.
Manual Sync
If you only want to sync certain songs or playlists to your iPhone, manual sync can provide a more flexible operation for this purpose. So, how to proceed? Let’s take a look:
Step 1. Connect your iPhone to Mac and open the latest version of iTunes.
Step 2. In the content type selection interface on the left, select “Summary”.
Step 3. Check the box next to “Manually manage music and videos”.
Step 4. Open “Library”, locate “Downloaded”, and click to open it.
Step 5. Select the items you want to synchronize and tap “Add to Device”.
Step 6. After selecting your iPhone, click “Apply”.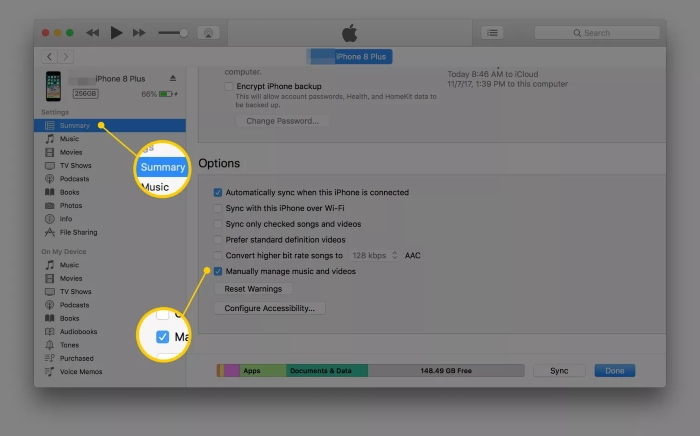
Part4. How to Move Apple Music to iPhone without Syncing
Although the methods mentioned above have their unique characteristics, they all involve the aspect of syncing. However, it is not entirely true that transferring music from Apple Music to an iPhone can only be done through synchronization. In fact, you can use a third-party converter to directly convert the songs on Apple Music into MP3 and other formats that can be saved locally. After that, you can transfer them to iPhone for direct offline playback.
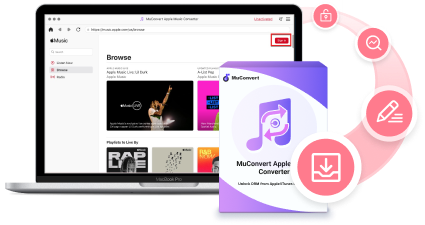
Speaking of a professional third-party Apple Music converter, among optimal selections, MuConvert Apple Music Converter, a powerful and user-friendly music converter that is available on both Mac and Windows systems, is at your pleasure. It provides access to download and acquire music files from Apple Music library. The download Apple Music files are formatted in universal MP3s. Finally, you can flexibly play songs offline directly with other music players on your iPhone.
Key Features of MuConvert Apple Music Converter:
- Swiftly convert singles, albums, playlists, and podcasts on Apple Music to 4 universal formats, and they are: MP3, WAV, M4A, and FLAC;
- A faster device performance and network speed will speed up the Spotify song conversion process by up to 10x.
- The User-friendly interface makes it easy to move your selected songs and add entire playlists or podcasts with one click.
- Settings for output parameters can be customized to meet specific requirements with great flexibility.
- Preserve all original ID3 tags such as song title, artist, album name, and more, which enables you to use your own music player on iPhone without losing any important details.
Now, let’s follow the guide below and go through the conversion process:
Step 1. Visit the official website and install MuConvert Apple Music Converter on your Mac or Windows computer.
Step 2. Launch MuConvert Apple Music Converter, and log into your Apple ID.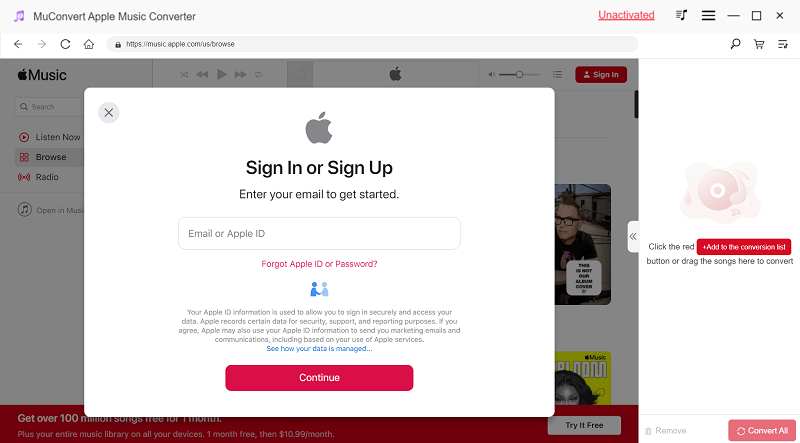
Step 3. Find the song (single or multiple) you want to convert in the embedded Apple Music Library, select and drag it directly to the conversion area (the “+” icon on the far right)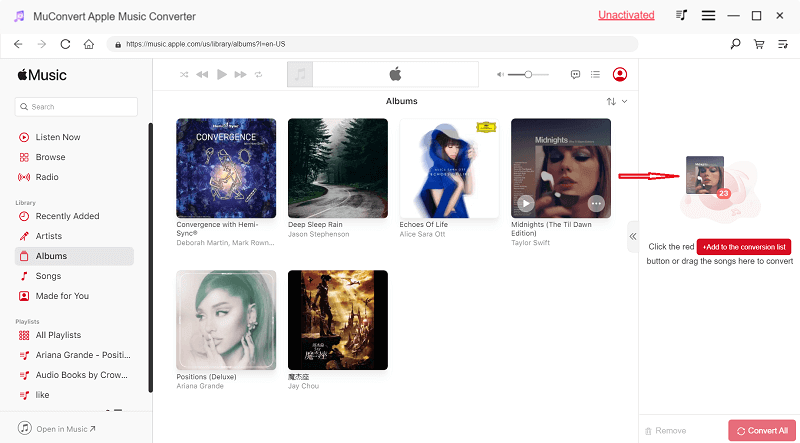
Step 4. Go to “Preferences” on the menu, and customize your output parameters.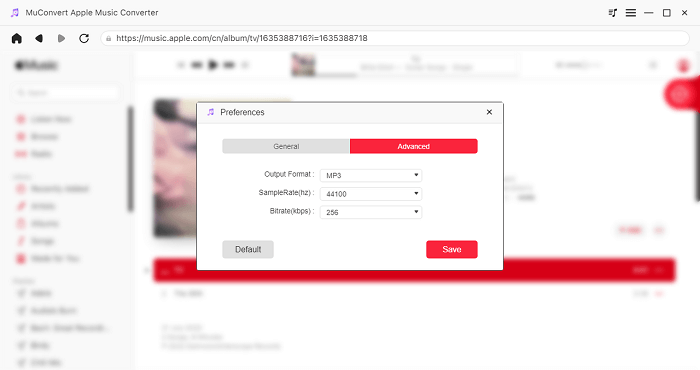
Step 5. Choose any format provided that you prefer by clicking “Converting all files to”
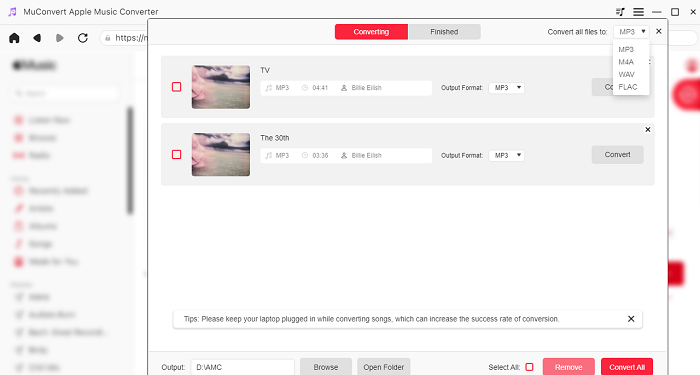
Step 6. Click on “Convert All”, and start conversion.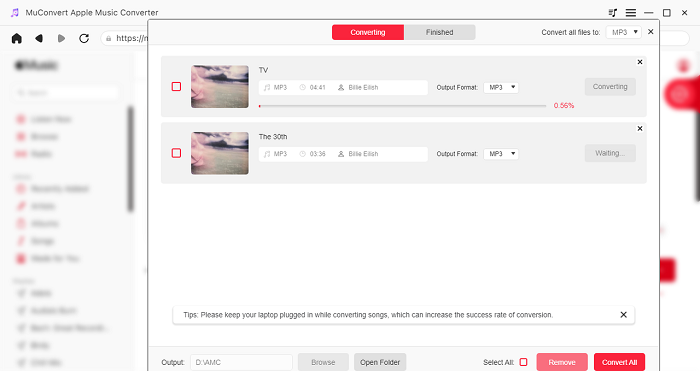
Step 7. After downloading all your desired Apple music, open iTunes on your Windows/Mac, click on “File”, and choose “Add to Library” to add them to iTunes.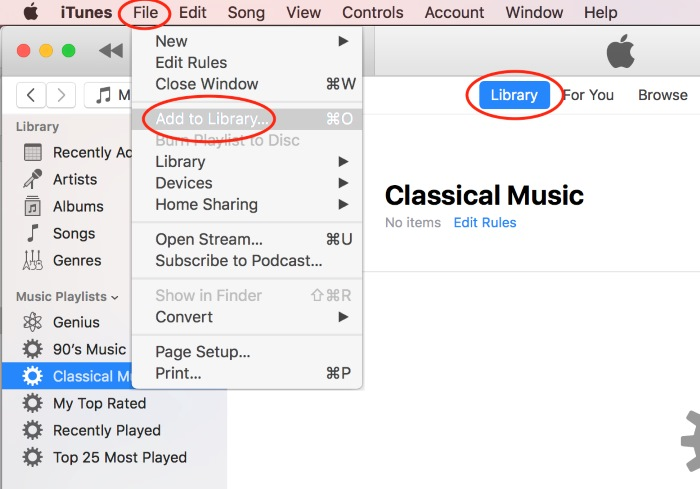
FAQS About Syncing Apple Music to iPhone
How to remove automatically synced music from your iPhone?
This process is quite straightforward, and you can achieve it using either iTunes or Finder on your Mac. However, it’s essential to note that starting from macOS 10.15 Catalina, iTunes is no longer available in future macOS versions.
Connect your iPhone to your computer > Open iTunes > Tab the iPhone device icon and select “Music” > Check the boxes below “Sync Music” based on your needs > Click on”Apply”
Note: Applicable if you haven’t updated to macOS Catalina or if you are a Windows user.
Open Finder after connecting your iPhone to Mac > Tab on the iPhone icon in the sidebar > Select the “Music” tab > Choose the content you want to sync (artists, albums, ratings, etc) > Click “Apply”
Note: Applicable if you have updated to macOS Catalina.
What should I do when Apple Music Library is not syncing?
To fix Apple Music syncing issues, ensure that you have a stable internet connection, your device’s operating system and Apple Music are up-to-date, and iCloud Music Library is enabled. You can also try restarting your device or signing out and signing back into Apple Music. If the issue persists, reset network settings or contact Apple Support for further assistance.
Conclusion
After reading this comprehensive guide, you can now sync your Apple Music to your iPhone across devices either automatically or manually using 4 different methods. However, if the Apple official methods are not able to meet all your requirements, MuConvert Apple Music Converter is always there for you.
As a professional third-party Apple Music Converter, it can quickly convert songs from Apple Music to local MP3 files, and then only with a few clicks, they will be transferred to your iPhone. Wait no more, and get a 30-day free trial now!
Convert Apple Music to MP3 Losslessly
Remove DRM from Apple Music songs and convert them to MP3 without quality loss.
More Posts
8 Best Apple Music Converter Detailed Review [App/Online] Read More » How to Remove DRM from Apple Music [New Updated!] Read More » How to Convert Apple Music to MP3 [2026 Updated] Read More » How to Convert M4P to WAV Lossless in 2025 [4 Ways] Read More »