As a loyal fan of Apple Music, when enjoying a particular song, if you don’t want to be bothered by the unstable network connection, or just hope to share your it with friends on other platforms, screen recording Apple music can be a huge demand. But the problem is how to screen record Apple music effortlessly. Don’t worry, this post will introduce 2 ways to answer the question. Just take the seat and follow along.
What Preparation You Should Make Before Recording?
- Make sure your device and operating system support the function of screen recording.
- Adjust the frame rate or other parameters on your screen recorder software according to your actual needs before recording
- Free up your device’s RAM memory by closing background applications to avoid interference with the recording.
How to Screen Record Apple Music on iPhone / iPad
Now that you have fully prepared with the tools you need, it’s time to show you how to screen record Apple music on iPhone or iPad devices. Just check the content below.
Built-in screen recording
Before you proceed, it’s crucial to be aware that if your current iOS version falls outside the range of iOS 11 to iOS 12, you might encounter an issue with the built-in screen recording function on Apple devices. This issue typically results in no sound being recorded, and it’s often attributed to DRM protection on songs from Apple Music.
For users with iOS versions beyond this range, a viable workaround involves utilizing your computer’s screen recording tool to capture the screencast and subsequently save it as an MP3 audio file. However, if you are currently using iOS 11 to iOS 12, then the instructions mentioned in the next part will be particularly relevant to your situation.
Once you’ve confirmed that your Apple device is running iOS 11 to iOS 12, leverage Apple’s native screen recording feature to capture Apple Music screen recordings. This ensures that audio can also be seamlessly included. There is no need to download and install additional applications. What’s more, this default feature also means it comes with no additional subscription fees. Meanwhile, it’s worth mentioning that the recorded video files are often highly compatible and can be easily played, edited, and shared on other devices or platforms.
With so many highlights, next will show you the specific procedures displayed on an iPhone device. Let’s take a look now.
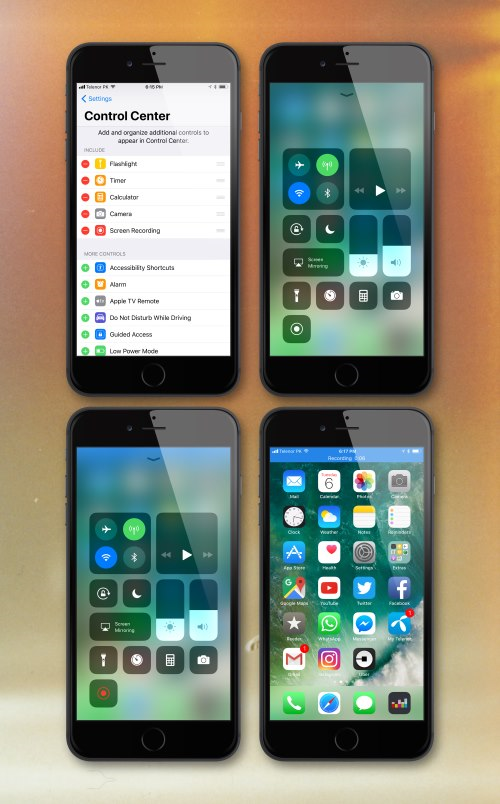
Step 1. Choose settings, locate the control center, and then click on the “+” icon next to Screen Recording.
Step 2. Play the song you would like to record from Apple Music.
Step 3. Open Control Center, click the Screen Recording button at the top, and wait for the 3-second countdown to begin.
Step 4. To finish recording, simply click on the red Stop Recording button.
Step 5. Finally, the audio file that you have recorded will be automatically saved to your device.
How to Do Apple Music Audio Recording on Mac/Windows
Screen recording Apple music via the iPhone’s internal recording feature seems to be an easy thing, but if you are using other devices, then the problem is how to do audio recording on Mac or Windows. At this time, you need to borrow a third-party tool to help you do the process.
However, you need to note that some software may not maintain the high quality of the original audio and video, resulting in distorted, blurry or reduced resolution of recorded Apple Music audio or video. Moreover, the recording process may be affected by the device performance, operating system version, and other factors, resulting in problems such as stalling, delay, and crash during the recording process.
After trailing and evaluating, MuConvert Apple Music Converter is highly recommended here for its excellent performance and successfully exceeding our expectations. It is an expert tool that is designed to remove the DRM protection of Apple Music, and then make the music content plainly MP3 files, so that you can transfer or export them into any other device you like for sharing.
Key Features of MuConvert Apple Music Converter
- Get rid of DRM protection: It lets you quickly download and convert all tracks on Apple Music Web Player so that you can play on any device when you are offline, even without suscription.
- Various output formats: You can not only convert Apple Music into MP3, but also other mainstream M4V, WAV, and even lossless FLAC formats .
- High output quality: The bit rate can be adjusted from 1128 kbps to 320 kbps, while the sample rate can range from 22050 Hz to 48000 Hz, providing a cinema-like movie-watching experience.
- Efficient downloading process: The technology accelerates downloads up to 10x faster and improves compatibility of all Apple Music songs in batch, saving valuable time.
- Embedded Apple Music Web Player: No need to install Apple Music apps or iTunes, just log on to your Apple Music account, and it will automatically detect and analyze your Apple Music library.
- Retain Original ID3 Metadata: ID3 tags and metadata information like title, artist, album, etc. Will be maintained during the transformation, making music collection management easier.
How to Convert Apple Music to MP3?
MuConvert Apple Music Converter is designed with a simple interface to ensure that each of you can quickly master the functionality. Only a few simple steps are needed to convert Apple Music to MP3. Let’s check them below.
STEP 1. Launch MuConvert Apple Music Converter
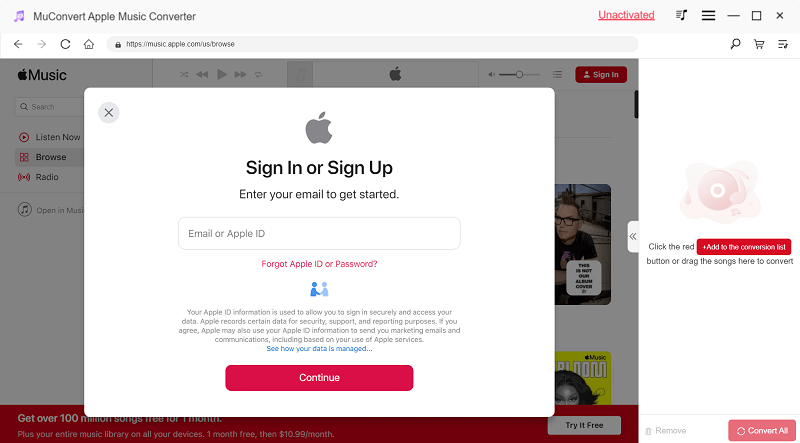
After opening the Apple Music Web browser on the main interface, sign in with your Apple ID (or you will not be able to access and download tracks from it).
STEP 2. Select Your Wanted Song
Once you log in, you can then browse Apple Music Web Player and choose the songs you’d like to download, and then convert them to MP3 at the best of 320kkbps. Once you find a song, playlist, or album you like, drag it to the “+” button to handle the transformation.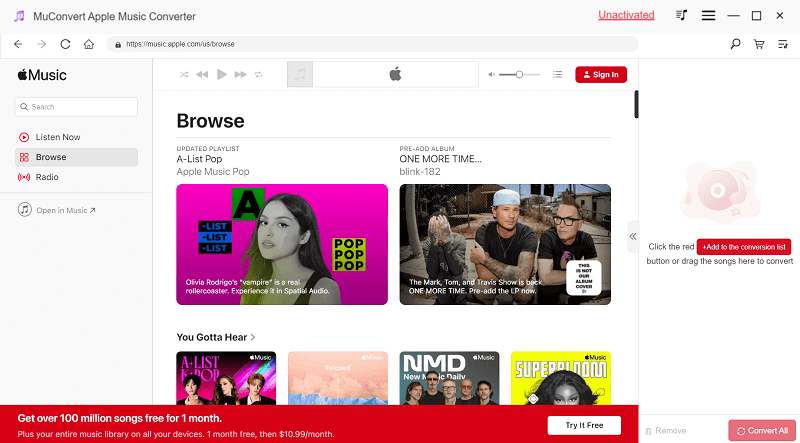
STEP 3. Choose the Output File
You can now switch to “Convert All Files” and choose “MP3” as your output. You can also choose other formats, such as M4A, WAV, or FLAC, just as you like.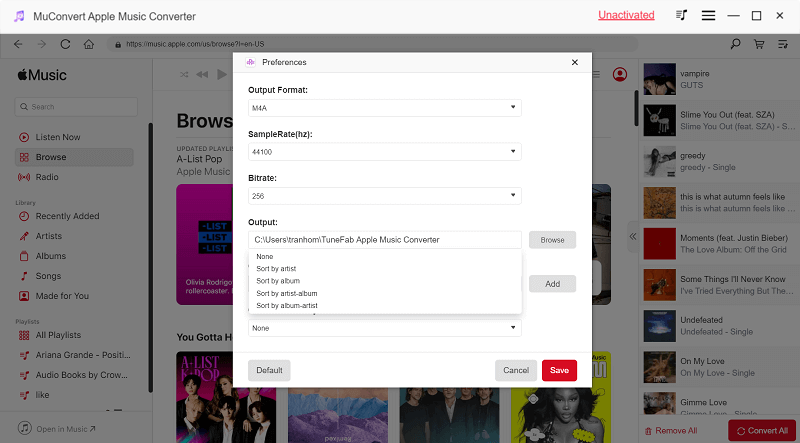
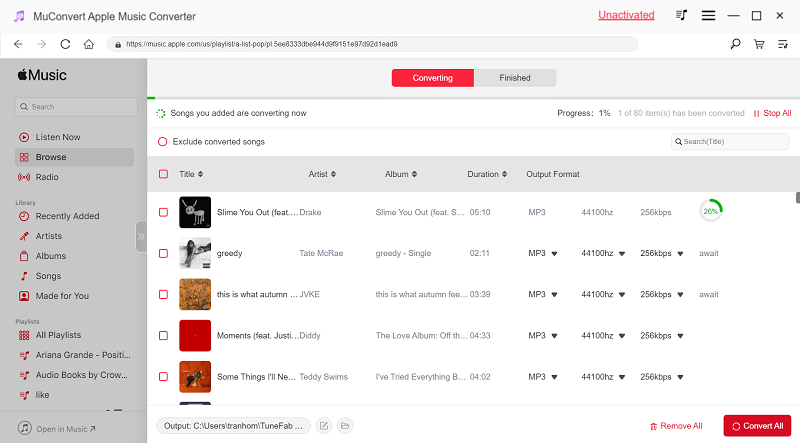
STEP 4. Start Downloading Process
In the end, you just need to press the “Convert All” icon to download this content, and all of this will be finished within several seconds.
FAQs About Screen Recording Apple Music
Keep getting stuck while using screen recording on iPhone to capture Apple music. What should I do?
If this phenomenon appears, it may have several reasons, such as unsatisfactory equipment performance, insufficient running memory, background applications occupying resources, and inappropriate recording settings (eg. high resolution).
Faced with this problem, first, you can try to close redundant applications running in the background, clear device storage space, and make sure your operating system is up to date. Second, the option of updating can fix some known issues and provide better compatibility and stability. If the above suggestions don’t work, try restarting your iPhone.
Screen Recording cannot record Apple Music’s audio on my iPhone, how to fix it?
Apple Music is a charged music service with copyright protection and usage restrictions. Some screen recording software may not be able to record or save the audio portion of Apple Music, because it interferes with the issues of copyright protection.
Under this circumstance, downloading Apple music into local MP3 files can be an ideal alternative choice for you. MuConvert Apple Music Converter is the most appropriate tool that can help you to do this easily. Just download it and have a try. You won’t be disappointed.
Conclusion
By and large, if you are still looking for some tool that can help you screen record Apple music for stable offline listening or just want to transfer it for sharing, altogether two ways are offered in this article. One is operating the iPhone’s internal screen recording function, and the other is using the third-party tool named MuConvert Apple Music Converter. Comprehensively speaking, the latter is more efficient, convenient, and stable because it can easily download Apple music into highly compatible MP3 formats.
Convert Apple Music to MP3 Losslessly
Remove DRM from Apple Music songs and convert them to MP3 without quality loss.
